

Logitech Ultrathin Keyboard Cover for the iPad
Update: Another week later and I am pretty pleased with the combo. Not only is writing so much more enjoyable but I also take my combo to more places and therefor I used even more. Now it pays off that I have an iPad with LTE making working online a breezy and pretty darn quick. Even when I am at a place with free Wifi I often ditch it because LTE is so much faster like on Airports or Startbucks. Up to know I never ran out of battery on the keyboard and I'll charge it everytime I charge the iPad. Last weekend I saw that Costco is selling the keyboard cheaper than at the Apple store but I would never have bought it there. My experience with electronics from Costco is that its hardware is in buggier and dies quicker than hardware from the Apple store.
Update: I am using the Keyboard for now a week and it already paid for half of its cost. Waiting at the Optomotrist for around half an hour and so I started writing a documentation for my current project using Byword. After I came home I got the document through Dropbox and included it into the final document. Because it works so well I bought Textastic to see how easy or difficult it is to develop code with the keyboard. For now the only problem I see with that is that the code has to be placed on Dropbox or an FTP server which works for smaller projects but for bigger projects with GIT that might become a space issue.
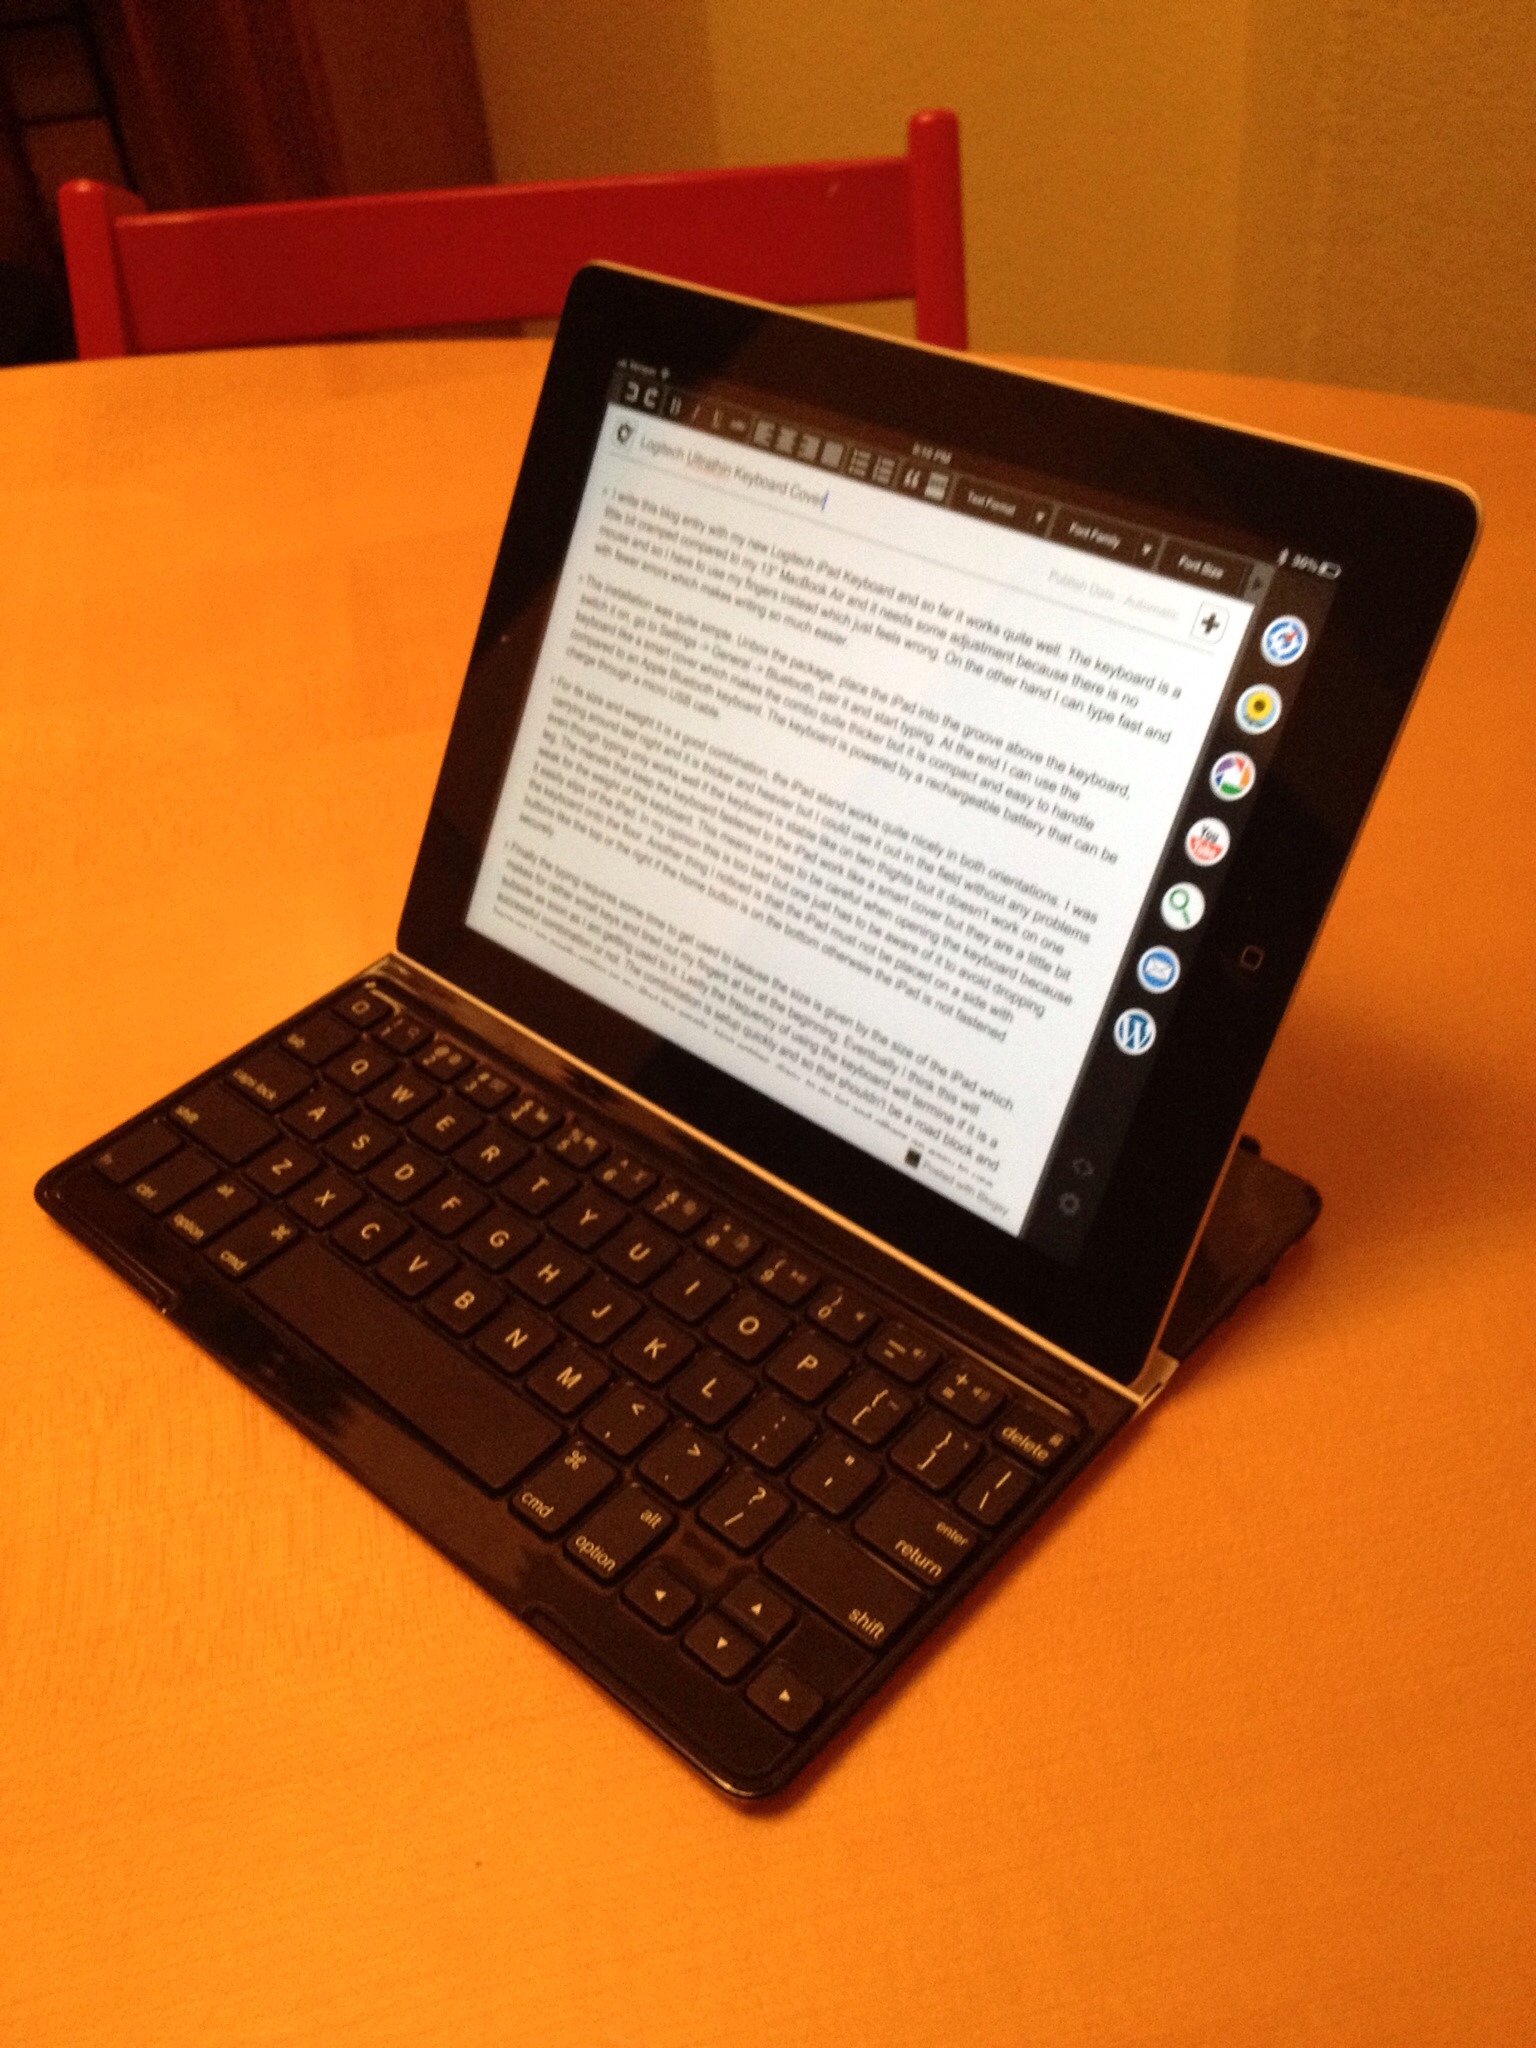
I write this blog entry with my new Logitech iPad Keyboard and so far it works quite well. The keyboard is a little bit cramped compared to my 13'' MacBook Air and I need some adjustment because there is no mouse and so I have to use my fingers instead which just feels wrong. On the other hand I can type fast and with fewer errors which makes writing so much easier.
The installation was quite simple. Unbox the package, place the iPad into the groove above the keyboard, switch it on, go to Settings -> General -> Bluetooth, pair it and start typing. At the end I can use the keyboard like a smart cover which makes the combo quite thicker but it is compact and easy to handle compared to an Apple Bluetooth keyboard. The keyboard is powered by a rechargeable battery that can be charge through a micro USB cable.
For its size and weight it is a good combination, the iPad stand works quite nicely in both orientations. I was carrying around last night and it is thicker and heavier than just the iPad but I could use it out in the field without any problems even though typing only works well if the keyboard is stable like on two thights. The magnets that keep the keyboard fastened to the iPad work like a smart cover but they are a little bit weak for the weight of the keyboard. This means one has to be careful when opening the keyboard because it easily slips of the iPad. In my opinion this is too bad but one just has to be aware of it to avoid dropping the keyboard onto the floor. Another thing I noticed is that the iPad must not be placed on a side with buttons like the top or the right if the home button is on the bottom otherwsie the iPad is not fastened securely. The best way is to lay down the combo with the keyboard at the bottom, lift up the iPad, take it off the hinges and place it into the groove. The groove seems to have magnets, too, keeping the iPad securely in place.
The typing requires some time to get used to beause the size is given by the size of the iPad which makes for rather small keys and tired out my fingers at lot at the beginning. Eventually I think this will subside as soon as I am getting used to it. Lastly the frequency of using the keyboard will termine if it was a good purchase or not. The combintation is setup quickly and so that shouldn't be a road block and because I am mostly writing on my iPad like emails, blog entries, diary, to do lists and others an easy to use physical keyboard should be a heaven send. But as often the little details are deciding if it works out or not.
Here is a picture on the combo in action:
Here a comparison of the combo versus a MacBoor Air 13'':

– Andy
MySpace all over again: Twitter
When I read about App.net in a Tweet from Marco Arment I checked out their video but did
not understand what App.net was all about. Later I started to learn more about Twitter
and how they started to curtail the features of third party apps. Eventually I started to
understand what App.net is for and signed up for it.
So today I saw [[http://www.marco.org/2012/08/22/black-widow|this post from Marco]] and
now I am glad that App.net is there just to make sure that Twitter has some competition
in case they keep on with the current direction.
Running my own business I understand that Twitter has to make a profit to remain in
business but it must do that carefully to remain relevant. Because Twitter only offers
a simple, actually very simple service it is history very quickly like MySpace and other
Internet services. For example Apple with the App Store needs the developers to provide
Apps that enriches the iOS experience even if they make no profit with it. So Apple
changed parts of their policies to remain attractive. That said Apple makes most of its
profit from the hardware sale and so Apple is in a way better position that Twitter.
Now Twitter can go ahead and say that they are big enough and have enough Celebrities
to stay alive but then Twitter becomes a marketing outlet for Celebs and Companies which
makes for a rather dull experience. But if that is what Twitter wants, at it awfully
looks like that, then that is what they get but without me.
For now App.net is still **Alpha** and so I am not using it regularly and so most of
my bitching about Twitter vs. App.net is happening on Twitter but I hope that soon
there are clients out there that handle App.net. Then I guess I can start moving over
to App.net.
– Andy
Pelican: Another Way for Madplanet.com Inc. Site?
Lately Bluehost.com gives me some grief and so I am thinking about changing my provider.
So I started to think that maybe this would be a good opportunity to also switch from WordPress to an easier setup.
What I would like to do is to use Markup to write by posts and pages but also wanted to see
if it is possible to avoid having to deal with a DB. Not that I hate to use a DB but backing
up the data and exporting the content is not that simple. But then again what should I use and is it ready worth the effort.
Then I found this page from [http://www.macdrifter.com/2012/08/pelican-guide-moving-from-wordpress-and-initial-setup.html|Macdrifter] talking about Pelican which would just do that.
But instead of plunging right into it I wanted to do an intermediary step by having the Site
first running on my local Mac (Apache, Python already there) and when it is working as expected
I will go ahead and push the content from my Mac to the ISP.
First step was to just get Pelican installed and up and running before going ahead.
Afterwards I would recreate Madplanet.com’s website on my local Mac so that I don’t have
to bother my ISP or damage the installation. From there I will migrate the content over
and when it is done I will push the content out and pull the plug on the old site.
Pelican Installation ∞
To my surprise the installation and configuration of Pelican was straight forward:
sudo -s
easy_install markdown
easy_install pelican
easy_install pygments

mkdir /Library/WebServer/Documents/pelican

pelican-quickstart
Now don’t waste too much time on the questions. Just answer what you can and leave the rest
blank or accept the defaults. It is only generating a configuration file for most parts.
The only important thing is that the location for pelican is at the previously created
directory (/Library/WebServer/Documents/pelican). You can select any directory you
like but this is the default given by Apple and so I used this.
Apache configuration ∞
The Apache Configuration can be different on every computer and so here I only describe
the simplest solution to set Pelican to be the root document root. For that I just set
the Apache Document Root to the Pelican’s Output directory:
#
# DocumentRoot: The directory out of which you will serve your
# documents. By default, all requests are taken from this directory, but
# symbolic links and aliases may be used to point to other locations.
#
DocumentRoot "/Library/WebServer/Documents/pelican/output"
and then define that Directory:
<Directory "/Library/WebServer/Documents/pelican/output">
    #
    # Possible values for the Options directive are "None", "All",
    # or any combination of:
    #   Indexes Includes FollowSymLinks SymLinksifOwnerMatch ExecCGI MultiViews
    #
    # Note that "MultiViews" must be named *explicitly* --- "Options All"
    # doesn't give it to you.
    #
    # The Options directive is both complicated and important.  Please see
    # http://httpd.apache.org/docs/2.2/mod/core.html#options
    # for more information.
    #
    Options Indexes FollowSymLinks MultiViews

    #
    # AllowOverride controls what directives may be placed in .htaccess files.
    # It can be "All", "None", or any combination of the keywords:
    #   Options FileInfo AuthConfig Limit
    #
    AllowOverride All

    #
    # Controls who can get stuff from this server.
    #
    Order allow,deny
    Allow from all

</Directory>
Last two steps are to check if the configuration is OK and then restart the Apache server:
sudo apachectl -t
sudo apachectl restart
See Pelican in Action ∞
Before we can go ahead we need to generate the site in Pelican. For that we go to the
project’s home directory (/Library/WebServer/Documents/pelican) and use make to generate
the site:
cd /Library/WebServer/Documents/pelican
make pelican
Finally we can open the site with this url: localhost.
Conclusion ∞
I am not done here by a long shot. First I need to have both the WordPress and the Pelican
site running on my Apache Server and then I need to export my WordPress site and install it
locally. But for now that’s all.
– Andy
When your Belly is the First Others Notice
Update: since three weeks I am trying to loose some weight and so far I was able to loose seven pounds. It wasn't easy because I am still hungry from time to time making me moody and irrtable. Then during the meal I have to make sure that I don't eat too fast and so too much. In order to keep my hunger in check I eat enough to feel full at least once a week. Today I am back in Silicon Valley and so I took the chance to go to the gym for some running. Loosing around 500 kcal makes eating dinner so much more fun having already earned some credits.
Being back on the road for a few weeks I noticed on the airports that my shirts feel tight and crossing my arms in front of me put an uncomfortable pressure on my stomach. At the end of the second week I had enough and I decided to slim down.
You might wonder why I did not say that I went on a diet because I actually did not do it. What I started to do is to eat less and started to work out but I did not change what I eat or in what order. So I am still eating fries, drink beer or eat cake and chocolate.
Now don't get me wrong I am often hungry and moody because of that but this becomes less over time. This also means the time between 11am and lunch and 5pm and dinner becomes a stretch. And because eating hungry isn't good due to overheating I eat a little bit then. In addition I also sit down to eat even when I bring my food to my desk. Then I stop eating when I feel full plus one or two more bites just for good measures. So far my progress is modest but I like to change how much I eat than how much weight I lose. The second comes eventually with the first but without the bungee effect.
With respect to the workout I actually didn't start it to loose weight but to manage my lower, upper back and shoulder tensions creating some nasty headache when I am back with my family and it worked out so far. But it also leaves to a guilt-free dinner having burned a big part of it before.
The next big challenge will be when I'm done with my road trips and I am home full time. I need to keep on doing my workout as well as keep eating less especially when my kids are all back at school and I'm home alone.
Cheers – Andy
Annotate Screenshots in Mountain Lion is Super Easy
I often have to create documentation with screenshots of web pages or applications. In order to make it easier for a reader to focus on what is important I want to annotate the image with ovals, rectangles or text. So far this was not very easy but by pure luck I figured out a quit fast and easy solution which does not to require to create temporary files.
These are the steps:
- Create a screenshot to the clipboard (Shift-Control-Command-4) and optionally you can then hit the spacebar to select a window
- Go to Preview (open it if not yet done)
- Create new document (Command-N) => the image from the clipboard is placed automatically into the window
- Annotate (like Control-Command-R) the image
- If needed select all (Command-A)
- Copy the image (Command-C)
- Go to the target App (Nisus Writer, Pages etc)
- Paste the image (Command-V)
The only annoying step is that I have to “delete” the image in Preview afterwards but that can be done at the end.
I can also copy an image from the target document or from another source like Safari etc.
Happy documenting – Andy