

CQ Workflow Tutorial: Workflow Step Dialogs
Attention: This article is written in Markdown and so I will look different. This is a test and if the deminished look is too bad then I will convert it back to Blogtext.
In the last Article of this Tutorial we were looking into how to create our own Workflow Process but then we used the Process Step inside the Workflow Model to execute it in our Workflow. As the other Workflow Steps inside the Sidekick:
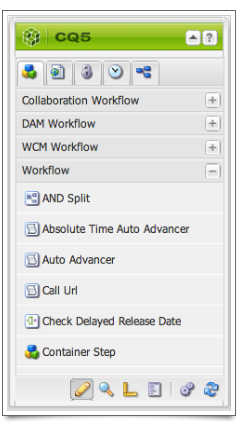
it would be nice and cool if we could make our Workflow Process appear as Step inside the Sidekick and with it to have our own dialog where the arguments are nicely presented. Digging around inside the CQ’s /libs folder I eventually found the out-of-the-box Workflow Steps and after some trial-and-error I figured out how to make it work. The only tricky part is to make sure that the absolute link to the process arguments is correct otherwise the arguments will not appear.

Markdown, Quotes and Source
Another little thing that I did not know about Markdown is to write quotes and source code.
In all IT there is always someone smarter than the smartest one you know
and always someone dumber than the dumbest one.Me
Here is some Java code:
public class Test {
    public statif voir main( String[] pArguments ) {
        // doing nothing as usual
    }
}
Have fun – Andy
Markdown and Images
As mentioned before I am still figuring out how to make Markdown work with MarsEdit and my WordPress blog. The last big issue is how to deal with images. Images in Markdown are simple by just adding an exclamation mark in front of the Image URL.
There is an  which is got last week.
So far the workflow was:
-
Open MarsEdit
-
Open Media Manager of MarsEdit (not really necessary but helpful)
-
Open Upload Utility
-
Drag an Image from the Media Manager onto the Upload Utility
-
Adjust the properties and upload the file
-
Go to WordPress, Media Library and obtain the URL to the image
-
Add it the post
It would be nice tough if MarsEdit could do everything from within the Media Manager. On the Media Manager below the Image properties should be a button to upload the image and on then on the Published Image there should be a right-click context menu entry that would provide the URL for it. That would make it a two step process.
Cheers – Andy
First Step with Markdown
Update: after making the decision to go with Markdown and installing Markdown on Save Improved Plugin for Workdpress it was pretty easy. The only thing to remember is to add two spaces at the end of a paragraph to end that paragraph and not to forget to add the reference links at the end of the document. I could also preview the page as formatted Page in the MarsEdit Preview Page when selection the Markdown Filter at the bottom.
After buying and reading MacSparky’s Field Guide to MarkDown I wanted to see how difficult it is to use Markdown together with MarsEdit to write my posts and WordPress on Madplanet.com. There are few things that I am not sure if it works:
1) Using Markdown on future Posts but using Blogtext on my older Posts
2) Using Links within a Post
3) Displaying Source Code
4) Integrating Images
So far I am pretty happy if I just can use Markdown for simple posts now and later us it more advanced posts or tutorials.
Cheers – Andy
CQ Workflow Tutorial: Extending CQ Workflows with Workflow Porcess
There are a few useful Workflow Steps available that enables you create nice Workflow Models. That said many features are not provided or are implemented badly. This is a list of features that are missing out of the box:
- Logging of the Payload, Meta Data etc
- Replication using a Particular Replication Agent
- Sending Email Notifications using a Particular Template
- Conditional Jumps
-
etc
When building a CQ Workflow Models you are adding / configuring Steps which you select on the Sidekick:


CQ Workflow Tutorial
Last weekend I started to write down some articles about CQ’s Workflows. Initially I thought this will be composed of a few articles and that’s it. But then I remembered what I learned about Workflows since last year and even today I am still learning how CQ Workflow works and how to tweak them to make them do what I want / need them to do.
As of now I am thinking that I need to move these articles into a series of pages so that it will remain intact and in order of the Tutorial. This way it will be easier for readers to follow.
So what do I plan to add to the tutorial? This is a short list of what I plan to do in the future but I am pretty sure there will be more:
- Workflow Process and how to add custom functionality
- Workflow Step Dialogs to make Workflow Processes easier to use
- Dialog Participant Step Revision 3: how to use the selected data
- Making Workflows more Transparent with Logging
- (Conditional) Jumps inside a Workflow
- Workflow Vows and how to Handle Them
- Workflow Process / OSGi Service Configuration with Rumodes
-
Where did my Comments Go?
There is way more but I am not sure how many readers will actually use them so we will see.
Cheers – Andy
CQ Workflow Tutorial: Selection Dialog Revision 2
In this article we revisit the previously discussed Dialog Selection problem. In my opinion the Dialog is easier to deal with from a code editor than from within CQ Dialog Editor or CRXDE Light. When I am working on Workflows the only piece I edit in CQ are the Models. Everything else I code by hand based on examples. For that purpose I have the libs folder extracted from the **cq-content-<version>.zip (CQ Package).
Creating a Dialog ∞
Based on the previous project CQ Workflow Tutorial Basic Project Setup we are going to add the Dialog, create a new version of the Selection Data Provider and adjust our Basic Workflow. Finally we are going to install it in CQ.
In case you did not through the previous article or in case it is messed up go back to that article and download the solution.
First we need to decide where to place the dialog component. I am not sure if that is the best place but I always but my dialogs in the /apps/<project>/components/workflow/dialog folder within the View module.
-
Create this folder in the View module: /src/main/content/jcr_root/apps/cq-workflow-tutorial-basic/components/workflow/dialog.

CQ Workflow Tutorial: Basic Project Setup
As already mentioned in the previous article developing CQ Workflows is not easy due to many parts that need to play together and because most of the action is happening behind the scene. Therefore it will be time-consuming and frustrating from time to time. There are a few things that I learned over the past year and a half that will make your life easier. One of the most important tips to consider is to clamped down on the number of moving parts and to be able to review and undo changes if necessary. That is why I have all code and configuration related to a CQ Workflow inside a VCS tool and use Maven to install the Workflows in CQ.
Attention: Even though I use a VCS tool and Maven to manage a Workflow the actual Workflow Model is edited inside CQ Workflow Model Editor. I tried to edit workflows within a Code Editor (IntelliJ IDEA) but beside simple changes in text properties I failed to make it work. The Workflow Model Editor will not bring up the Model if there is a slight inconsistency and so you might loose your work.
Creating a Workflow Models ∞
As said above you cannot edit Workflow Models by hand. This means you need to open the Workflow Model inside the Workflow Editor by double-clicking on the Workflow Model and then change the Model in its Editor. Now this is a problem if you have the Workflow in VCS because when you would reinstall the Workflow Model you would loose your changes. This is my process on how to edit Workflows inside CQ and still keep the golden copy in a VCS:
-
Create a Workflow inside the Workflow Editor by clicking on the New button. Give it a Title (displayed name). Here we use Basic Workflow

CQ5 Workflows: Selection Dialog
Since a few years I am working with Adobe CQ (formerly Day CQ) doing mostly backend software like ETC Mapping, Link Rewriting, Dispatcher Cache handling, OSGi Services and mostly Workflows. About 1 1/2 years ago I did not know how the Workflows worked in CQ and now I am even adding additional functionality like a Dialog and Dynamic Participant Step.
Here I want to talk about how to provide a drop down box selection in a Workflow Dialog Participant Step. In order to make that work we need three parts:
- Servlet / JSP that provides an JSon Array with ‘text’ / ‘value’ pair
- Dialog Definition that contains the Drop Down Box
-
Dialog Participant Step using the Dialog Definition
Attention: There is a bug in the display of an embedded Dialog where the labels of the dialog are ignored. This is pretty annoying but the Workflow designer can add a hint into the title to make it clear what the fields are.
This is how the dialog will look like inside the Workflow Inbox:

Seriously Apple?
Last week my wife was complaining that the Apple TV had problems streaming her videos over Airplay. Eventually it turned out that the Airport Express (2012) was not working anymore. I used it to extend the wireless network because my Airport Extreme cannot reach the living room. The only problem was that I had no clue why it suddenly stopped nor did anything in the Airport Utility indicate any problems except that it stated it could not extend the network.
After a long googling session I seemed that the Airport Utility 6 had one flag missing – the one to allow to extend the network. Even if that is true I still have no idea why this stopped now because I upgraded to Airport utility 6 a while back. I also read that the only way to fix it is to install Airport Utility 5.6 but that is only available for Lion and I am running on Mountain Lion. A downgrade failed and so I was nearly giving up.
Eventually I found an Automator script that would allow me to install 5.6 by extracting it manually. On my MacBook Air it failed because on that machine the default extraction tool in not the Archive Utility but BetterZip. Copying the entire stuff over to another box and voile it worked. Then I only had to make a small change and update the Base Station (Airport Extreme) and voila everything worked again.
Looking at the post inside the Apple Community about this issue this seems to be quite old (September 22nd 2012). So, I am wondering what the heck Apple is doing. Why can this flag not be added to Airport Utility and if not why is Airport Utility 6 suddenly make extending the network fail.
So much for “it just works” – Apple