

CQ Workflow Tutorial: Workflow Step Dialogs
Attention: This article is written in Markdown and so I will look different. This is a test and if the deminished look is too bad then I will convert it back to Blogtext.
In the last Article of this Tutorial we were looking into how to create our own Workflow Process but then we used the Process Step inside the Workflow Model to execute it in our Workflow. As the other Workflow Steps inside the Sidekick:
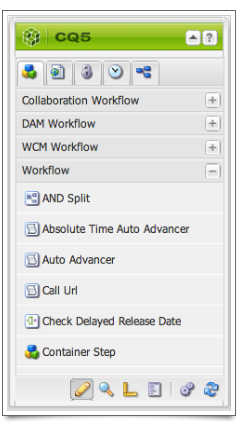
it would be nice and cool if we could make our Workflow Process appear as Step inside the Sidekick and with it to have our own dialog where the arguments are nicely presented. Digging around inside the CQ’s /libs folder I eventually found the out-of-the-box Workflow Steps and after some trial-and-error I figured out how to make it work. The only tricky part is to make sure that the absolute link to the process arguments is correct otherwise the arguments will not appear.
If you go back to the Dynamic Selection Dialog you will find that we already created a dialog and so we are half way there. That said we need some additional files and configuration changes:
- In the .content.xml file we need to make sure the node is of type cq/workflow/components/model/process and preferably inside the workflow group to make it easier to find
- In the _cq_editConfig.xml file we need to specify the class of our workflow process and if it does auto advance
- In the dialog.xml file we need to specify the **process arguments dialog*** if needed. A Dialog has one or more tabs in it.
- The file icon.png allows you to define your very own icon that goes along with the Title of the Workflow Step in the Sidekick.
- In the file processargs.xml you specify arguments tab. If you have more than two tabs then you need to add more such files and if you have no arguments then you can omit this file.
You can define that dialog inside the CQ Dialog Builder or through CRXDE Light but I find that quite cumbersome and error prone. So I just use a simple text or XML editor for that.
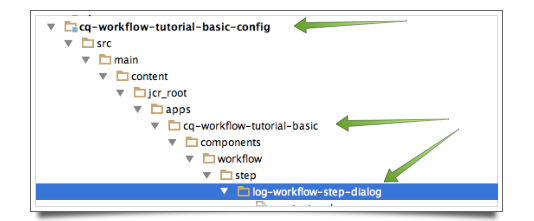
Workflow Step Location
Before we can start definition the dialog we need to create a folder structure to have a home for it. In the Config maven sub module there is already a folder inside the apps folder which is our project’s folder for all things related to apps including our dialog. A dialog is a component so we need to create the components folder and inside there a path to our Workflow Step’s home. Here is used workflow/step/log-workflow-step-dialog:
Workflow Dialog Node Definition
Like any other node in CQ you must provide the .content.xml file to define the node. For a Workflow Process this looks like this:
<?xml version="1.0" encoding="UTF-8"?>
<jcr:root xmlns:sling="http://sling.apache.org/jcr/sling/1.0" xmlns:cq="http://www.day.com/jcr/cq/1.0" xmlns:jcr="http://www.jcp.org/jcr/1.0"
          jcr:description="Log a Message in the Workflow"
          jcr:primaryType="cq:Component"
          jcr:title="Log Workflow"
          sling:resourceSuperType="cq/workflow/components/model/process"
          allowedParents="[*/parsys]"
          componentGroup="Workflow"/>
Line 3 and 5 define the title and description of the Workflow Step. This can match the title and description inside the _cq_editConfig.xml file but it does not have to.
The important point to remember is that there is an unique title, primary type of a CQ Component and the Resource Super Type is a Workflow Process. The Component Group defines in which group inside the Sidekick the Workflow Step will appear. To group them with most of the CQ Workflow Steps you should use the Workflow group.
Workflow Edit Configuration
This is here to define the Relationship between the Dialog and the Workflow Process and is placed inside the _cq_editConfig.xml file:
<?xml version="1.0" encoding="UTF-8"?>
<jcr:root xmlns:cq="http://www.day.com/jcr/cq/1.0" xmlns:jcr="http://www.jcp.org/jcr/1.0" xmlns:nt="http://www.jcp.org/jcr/nt/1.0"
          cq:dialogMode="floating"
          cq:inherit="{Boolean}true"
          jcr:primaryType="cq:EditConfig">
    <cq:formParameters
            jcr:description="Logs the given message to the log files. You can enter a place holder like payload, meta, comment, wf-data-meta (in curly brackets) etc into you message."
            jcr:primaryType="nt:unstructured"
            jcr:title="Log Workflow"
            PROCESS="com.madplanet.cq.workflow.tutorial.basic.services.osgi.workflow.LogWorkflow"
            PROCESS_AUTO_ADVANCE="true"/>
</jcr:root>
As you can see the title and description don’t match with the Dialog’s title and dscription. Just remember that the title and description in this file is what is placed inside the Dialog as default value when the Step is dragged onto the Model. So you want to make sure it is a good and precise title and description making it easier for the user to create a new step.
It is important that you set the PROCESS to the fully qualified Class name of your Workflow Process otherwise the Workflow will fail miserably when you it executes that step.
Workflow Dialog
The dialog.xml file is a regular CQ Dialog definition file:
<?xml version="1.0" encoding="UTF-8"?>
<jcr:root xmlns:cq="http://www.day.com/jcr/cq/1.0" xmlns:jcr="http://www.jcp.org/jcr/1.0"
          jcr:primaryType="cq:Dialog"
          title="Log Workflow - Step Properties"
          xtype="dialog">
    <items jcr:primaryType="cq:WidgetCollection">
        <tabs jcr:primaryType="cq:TabPanel">
            <items jcr:primaryType="cq:WidgetCollection">
                <processcommon
                        jcr:primaryType="cq:Widget"
                        path="/libs/cq/workflow/components/model/process/process_head.infinity.json"
                        xtype="cqinclude"/>
                <processargs
                        jcr:primaryType="cq:Widget"
                        path="/apps/cq-workflow-tutorial-basic/components/workflow/step/log-workflow-step-dialog/processargs.infinity.json"
                        xtype="cqinclude"/>
            </items>
        </tabs>
    </items>
</jcr:root>
It is really important to make sure that the Dialog Title also describes the Workflow because the User might forget what Workflow Step is open and then might get confused. It also helps to have an indication of the Workflow Step if someone takes a screenshot.
The entries in the items-tabs-items node denote a Dialog Tab inside the Dialog. You can reuse an existing one which we did for the Process Head configuration which will become the Common tab but then for the Process Argument Tab we used our own which is a fully qualified path to the file which the tab definition plus the .infinity.json postfix.
Workflow Process Arguments
Final step is to define the second tab inside the dialog where the user can enter the Arguments to that process. In our previous article about Selection Dialog we already covered some of the parts here.
First we need to define the Message Text Field and must give it a name like this: ./metadata/<Argument Name>. With that pattern the Workflow Engine will place the argument onto the Workflow Step Meta Data for us to pick up. In our LogWorkflow.java class we already have this in place:
String lMessage = lArguments.get( "message" );
meaning that we already prepared to pick up the argument. Keep in mind that ./metadata is an indicator for the Workflow Engine to place the Parameter onto the Step’s Meta Data Map and so it won’t have that as part of the name inside the Meta Data Map.
<?xml version="1.0" encoding="UTF-8"?>
<jcr:root xmlns:cq="http://www.day.com/jcr/cq/1.0" xmlns:jcr="http://www.jcp.org/jcr/1.0"
    jcr:primaryType="cq:Panel"
    title="Arguments">
    <items jcr:primaryType="cq:WidgetCollection">
        <arguments
            jcr:primaryType="cq:Widget"
            collapsed="{Boolean}false"
            collapsible="{Boolean}false"
            title="Process Arguments"
            xtype="dialogfieldset">
            <items jcr:primaryType="cq:WidgetCollection">
                <message
                        jcr:primaryType="cq:Widget"
                        fieldDescription="Message to be logged which can include placeholders like payload, arguments, meta, comment, wf-data-meta which must be enclosed inside curly brackets."
                        fieldLabel="Message"
                        name="./metaData/message"
                        xtype="textfield"/>
Now we want to go a little bit deeper here. We could just create another text field for the user to enter the log level but the user could misspell it and so we would need to write a longer description. A better way would to be using the same technique as in the Dynamic Selection Dialog article but a Servlet would be a little bit of an overkill for a static list of log levels. That said there is a way to specify a static list inside your dialog definitions with the options element. The Structure of each entry is similar to the JSon content we returned in the Dynamic Selection Dialog article.
                <logLevel
                        jcr:primaryType="cq:Widget"
                        fieldDescription="User can select the Log Level this Message is logged with"
                        fieldLabel="Log Level"
                        name="./metaData/logLevel"
                        type="select"
                        xtype="selection">
                        <options jcr:primaryType="cq:WidgetCollection">
                            <error
                                    jcr:primaryType="nt:unstructured"
                                    text="Error"
                                    value="ERROR"
                                    qtip="Error Log Level"/>
                            <warn
                                    jcr:primaryType="nt:unstructured"
                                    text="Warn"
                                    value="WARN"
                                    qtip="WARN Log Level"/>
                            <info
                                    jcr:primaryType="nt:unstructured"
                                    text="Info"
                                    value="INFO"
                                    qtip="Info Log Level"/>
                            <debug
                                    jcr:primaryType="nt:unstructured"
                                    text="Debug"
                                    value="DEBUG"
                                    qtip="Debug Log Level"/>
                            <trace
                                    jcr:primaryType="nt:unstructured"
                                    text="Trace"
                                    value="TRACE"
                                    qtip="Trace Log Level"/>
                        </options>
                </logLevel>
            </items>
        </arguments>
    </items>
</jcr:root>
This concludes the setup of the Workflow Step Dialog.
Installation and Usage
To install just that dialog we can go to the Config sub module in our project and then fire up maven to build it with
mvn clean install -P auto-deploy -s ../settings.xml
Make sure that at the end of the build you see this statement in the output:
[INFO] Installing content...
Collecting import information...
Installing node types...
Installing privileges...
Importing content...
- /apps/cq-workflow-tutorial-basic/runmodes/config.author/org.apache.sling.commons.log.LogManager.factory.config-cq-workflow-tutorial-basic
- /apps/cq-workflow-tutorial-basic/runmodes/config.author.dev/org.apache.sling.commons.log.LogManager.factory.config-cq-workflow-tutorial-basic
- /apps/cq-workflow-tutorial-basic/runmodes/config.publish/org.apache.sling.commons.log.LogManager.factory.config-cq-workflow-tutorial-basic
- /apps/cq-workflow-tutorial-basic/runmodes/config.publish.dev/org.apache.sling.commons.log.LogManager.factory.config-cq-workflow-tutorial-basic
A /apps/cq-workflow-tutorial-basic/components/workflow/step
A /apps/cq-workflow-tutorial-basic/components/workflow/step/log-workflow-step-dialog
A /apps/cq-workflow-tutorial-basic/components/workflow/step/log-workflow-step-dialog/_content
A /apps/cq-workflow-tutorial-basic/components/workflow/step/log-workflow-step-dialog/cq:editConfig
A /apps/cq-workflow-tutorial-basic/components/workflow/step/log-workflow-step-dialog/cq:editConfig/cq:formParameters
E /apps/cq-workflow-tutorial-basic/components/workflow/step/log-workflow-step-dialog/dialog (javax.jcr.nodetype.ConstraintViolationException: No child node definition for dialog found in node /apps/cq-workflow-tutorial-basic/components/workflow/step/log-workflow-step-dialog)
A /apps/cq-workflow-tutorial-basic/components/workflow/step/log-workflow-step-dialog/icon.png
A /apps/cq-workflow-tutorial-basic/components/workflow/step/log-workflow-step-dialog/icon.png/jcr:content
A /apps/cq-workflow-tutorial-basic/components/workflow/step/log-workflow-step-dialog/icon.png/jcr:content/jcr:data
E /apps/cq-workflow-tutorial-basic/components/workflow/step/log-workflow-step-dialog/processargs (javax.jcr.nodetype.ConstraintViolationException: No child node definition for processargs found in node /apps/cq-workflow-tutorial-basic/components/workflow/step/log-workflow-step-dialog)
saving approx 10 nodes...
Package imported (with errors, check logs!)
Package installed in 194ms.
This shows you that the installation ran through and the parts were installed.
Workflow Step Usage
When we go to the Workflow Console http://localhost:4502/workflow we can select our Basic Workflow with a double click to bring it up in its Workflow Model Editor. The Sidekick’s Workflow Group should show our Log Workflow Step:

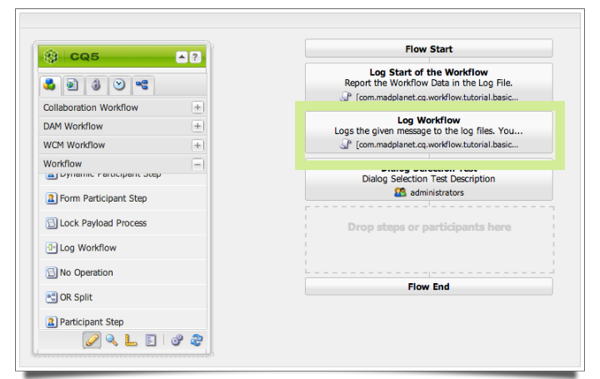
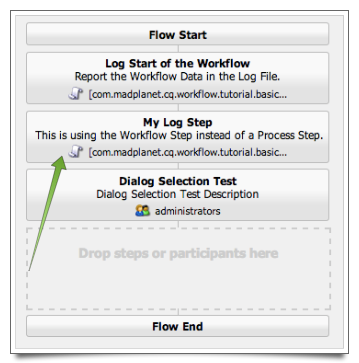
We can now drag that Step onto our Workflow Model so that it becomes part of the Workflow Model. Notice that it uses the Title and Description of the _cq_editConfig.xml file as default values:
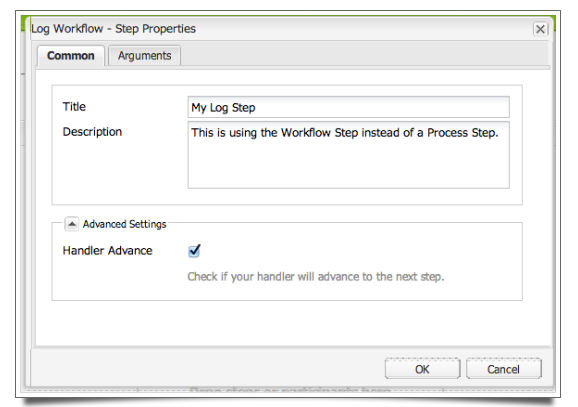
A double-click onto that step will bring up the Workflow Step Dialog with a Common and an Arguments tab. In the Common tab the Advanced Settings are normally closed but I expanded it here to show that Handler Advance is checked. If that would not be set then the Workflow would have to be manually advanced in order to proceed. We will see later where we don’t want to advance ever.
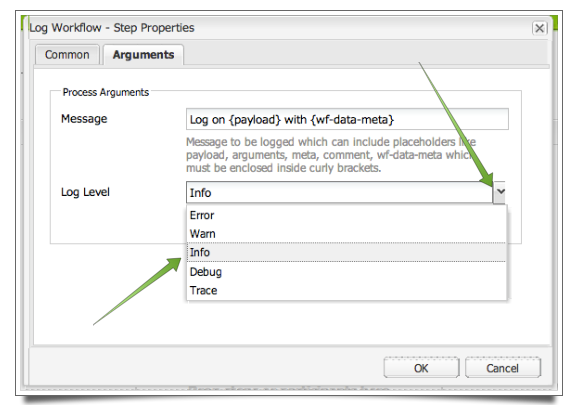
Clicking on the Arguments tab we will see our input fields: Message and Log Level. The message will take any text but you can embed placeholders to make the message more meaningful especially the wf-data-meta which carries the data throughout the workflow is probably the most useful (beside the payload).
When expanding the Log Level drop-down-box you will see the values we entered into the selection as options. This is easier for the User to understand and to use than to enter a text. Keep in mind that any effort to avoid issues with Workflows is making them more accepted by the users and therefore has a higher chance of actually being used:
Now we are through with the Workflow Configuration and we can click the OK button to save it.
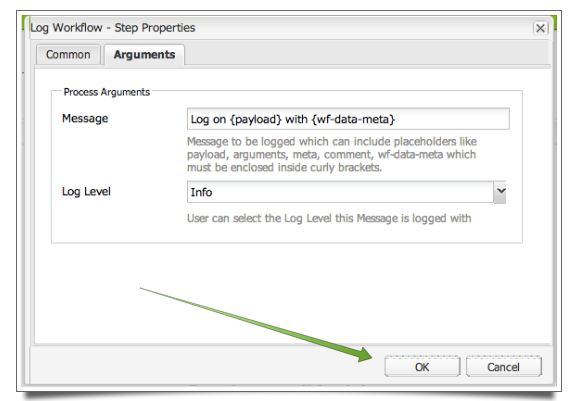
Finally we are done with the Workflow Step Configuration:
ATTENTION: Please make sure that you clicked the Workflow Model’s Save Button otherwise you will not see the changes when you run the Workflow and you might loose your changes when you close the browser window.
Now running and testing the Workflow is the same as in the Previous Article descibed.
Final Project
As before here is the solution of what we discussed here:
cq-workflow-tutorial-basic.workflow.step.zip
Cheers – Andy Schaefer
Leave a comment
You must be logged in to post a comment.