CQ Workflow Tutorial: Basic Project Setup
As already mentioned in the previous article developing CQ Workflows is not easy due to many parts that need to play together and because most of the action is happening behind the scene. Therefore it will be time-consuming and frustrating from time to time. There are a few things that I learned over the past year and a half that will make your life easier. One of the most important tips to consider is to clamped down on the number of moving parts and to be able to review and undo changes if necessary. That is why I have all code and configuration related to a CQ Workflow inside a VCS tool and use Maven to install the Workflows in CQ.
Attention: Even though I use a VCS tool and Maven to manage a Workflow the actual Workflow Model is edited inside CQ Workflow Model Editor. I tried to edit workflows within a Code Editor (IntelliJ IDEA) but beside simple changes in text properties I failed to make it work. The Workflow Model Editor will not bring up the Model if there is a slight inconsistency and so you might loose your work.
Creating a Workflow Models ∞
As said above you cannot edit Workflow Models by hand. This means you need to open the Workflow Model inside the Workflow Editor by double-clicking on the Workflow Model and then change the Model in its Editor. Now this is a problem if you have the Workflow in VCS because when you would reinstall the Workflow Model you would loose your changes. This is my process on how to edit Workflows inside CQ and still keep the golden copy in a VCS:
-
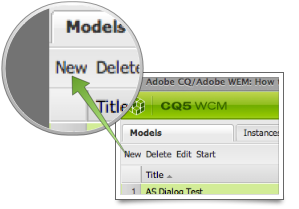
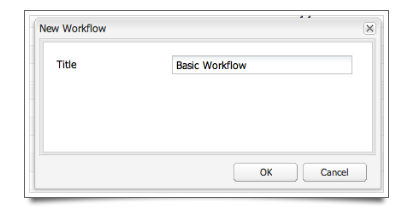
Create a Workflow inside the Workflow Editor by clicking on the New button. Give it a Title (displayed name). Here we use Basic Workflow
-
Go to CRXDE Light and to the node: /etc/workflow/models and expand that node
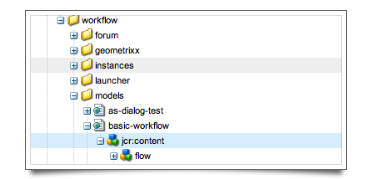
- The Node Id is the same as the title but all lower-case and spaces (and other special characters) are replaces with dashes (here it is basic-workflow)
- Create a Folder where you are going to place your workflows (name the folder after the project). Here we name it tutorial.
- Attention: whenever you create a Folder in CRXDE light make sure you save it right away otherwise copying the nodes will fail.
-
Move the newly created Workflow into that folder
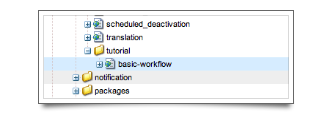
- Change the node id if necessary (remove double dashes etc).
- Go back to the Workflow Editor and refresh the list of Models and you will see that nothing has changed.
-
Please make sure that you close any open Model Editor of your workflow(s) because they might still be pointing to the old location.
The major reason to put your own workflows inside a folder is to make it easier to manage them and to keep them separate from the out-of-the-box workflows from CQ. It also makes it easier to export the models later using the CQ Package Manager.
Note: Beside the Workflow Launchers I keep all other pieces of the Workflow in their own separate folder like Models, Scripts and Notifications.
Create a Maven CQ Project ∞
In case you start from scratch (and that is what we do here) we need to create a Maven project where we can keep our workflows and its component, edit them, add to a VCS and eventually install them in CQ. Even thought we could create a simple project from scratch here I want to use cqblueprint’s Maven Archetype to setup our project here. This is quite simple and straight forward:
-
Create a .settings file somewhere on your file system with that content:
<?xml version="1.0" encoding="UTF-8"?>
<settings xmlns="http://maven.apache.org/SETTINGS/1.0.0"
          xmlns:xsi="http://www.w3.org/2001/XMLSchema-instance"
          xsi:schemaLocation="http://maven.apache.org/SETTINGS/1.0.0 http://maven.apache.org/xsd/settings-1.0.0.xsd">
        <profile>
            <id>cqblueprints</id>
            <activation>
                <activeByDefault>true</activeByDefault>
            </activation>
            <repositories>
                <repository>
                    <id>cqblueprints.releases</id>
                    <name>CQ Blueprints Release Repository</name>
                    <url>http://dev.cqblueprints.com/nexus/content/repositories/releases/</url>
                    <releases>
                        <enabled>true</enabled>
                    </releases>
                    <snapshots>
                        <enabled>false</enabled>
                    </snapshots>
                </repository>
            </repositories>
            <pluginRepositories>
                <pluginRepository>
                    <id>cqblueprints.plugins.releases</id>
                    <name>CQ Blueprints Plugin Release Repository</name>
                    <url>http://dev.cqblueprints.com/nexus/content/repositories/releases/</url>
                    <releases>
                        <enabled>true</enabled>
                    </releases>
                    <snapshots>
                        <enabled>false</enabled>
                    </snapshots>
                </pluginRepository>
            </pluginRepositories>
        </profile>
</settings>
-
Start the Maven Archetype with (adjust the path to the .settings file if needed):
mvn archetype:generate -DarchetypeCatalog=http://dev.cqblueprints.com/nexus/content/repositories/releases/ -Dfilter=multi-module -s ./settings.xml
-
Answer the following questions:
- Choose Archetype: 1
- Choose … Version: 5 (version 1.0.4 currently, but select the latest)
- Confirm properties configuration: n (this will let you add your own configuration properties)
- Defined value for property ‘groupId': com.madplanet.cq.workflow.tutorial.basic
- Defined value for property ‘artifactId': cq-workflow-tutorial-basic
- Defined value for property ‘version': 1.0.0-SNAPSHOT
- Defined value for property ‘package': com.madplanet.cq.workflow.tutorial.basic
- Defined value for property ‘project-name': Workflow Tutorial: Basic Setup
- Defined value for property ‘package': com.madplanet.cq.workflow.tutorial.basic
- Defined value for property ‘package':
- Defined value for property ‘package':
-
Confirm properties configuration: y
-
The Archetype will now create a project with these modules:
- cq-workflow-tutorial-basic-all: project that contains all but the Content package
- cq-workflow-tutorial-basic-config: project that contains the configuration for the project (run-mode configuration)
- cq-workflow-tutorial-basic-content: project that contains the Content of the Project to bootstrap developer or test environments
- cq-workflow-tutorial-basic-services: project that contains the OSGi services
- cq-workflow-tutorial-basic-taglib: project that contains JSP Taglibs
-
cq-workflow-tutorial-basic-view: project that contains pieces that defines the View / Appearance of the Project.
For our tutorial we only need the View module to place the Workflow Models.
Later we will use the Config and the Services module for the project.
Exporting / Syncing Workflows between CQ and VCS ∞
It is possible to keep your workflow synced between CQ and VCS using the File Vault but in my experience this is not stable and reliable enough. Therefore I create a CQ Package to export the models and then just copy the content into my VCS project. Every time I changed a workflow I go and rebuild the package, download, extract and copy the workflow model files into my project.
Attention: in order to keep up with the changes and to avoid losing any changes I always change the version number before building the package so that when I extract / copy the package content I know that it is the latest package.
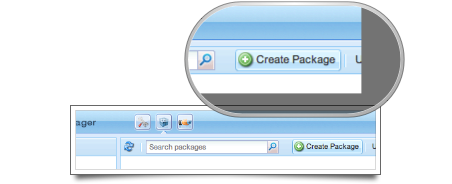
But first we need to create a CQ Package to export the Workflow:
- Go to the Package Manager (/crx/packmgr)
-
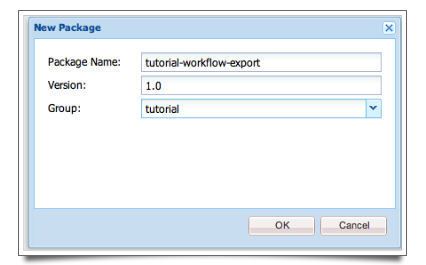
Create a New Package and name it tutorial-workflow-export, set the version to 1.0 and set the group to tutorial:

-
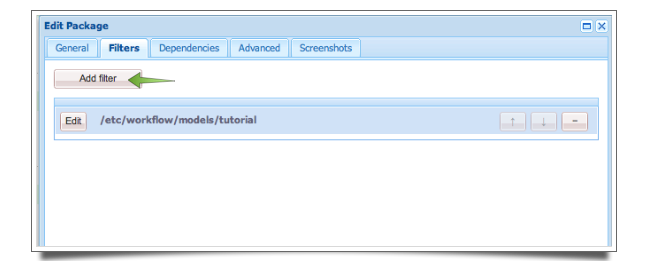
Click on the Edit button to add the necessary Package Filter (/etc/workflow/models/tutorial):
- Now we are ready to go and Build the package and Download it
-
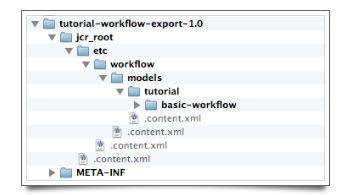
Next step is to extract the downloaded ZIP file and the folder structure should look like this:
-
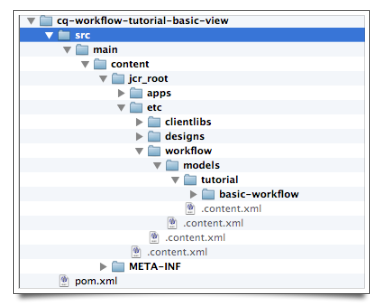
Copy the workflow folder into the src/main/content/jcr_root/etc folder of the View module:
-
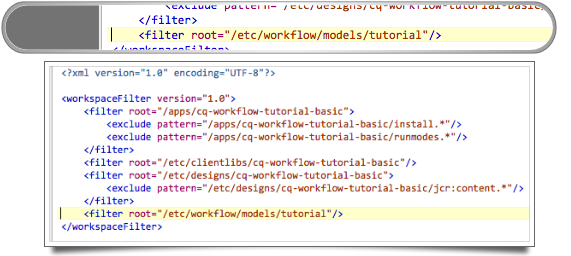
Finally we need to make sure our new models are imported into CQ later. For that go to the /src/main/content/META-INF/vault/filter.xml file and add line including our Workflow Model directory:
-
Now we are done.
Attention: after we did the initial copy of the workflow folder I always only copy the changed model(s). For that I use Delta Walker on my Mac (you can use Beyond Compare on Windows) to be able to compare the changes before copying them.
Install the Workflow in CQ ∞
Finally we want to make sure that our workflow is installed in CQ from the Maven project so that we can start working with it.
In order to test the installation we need to remove the Workflow Model first in CQ and the run Maven and if the Workflow is back there we are good to go:
- Go to CRXDE Light (/crx/de) and there to the folder /etc/workflow/models and delete the folder tutorial.
- Save the changes using Save All
-
Go to a command line window and build the View project:
mvn clean install -Pauto-deploy -Dcq.host=localhost -Dcq.port=4502 -Dcq.user=admin -Dcq.password=admin
If you go back to the Workflow Editor and list all the Models our Workflow Model should appear again (Basic Workflow).
Attention: I listed all the properties for the CQ connection (cq.host, port, user and password) but these are the defaults so you don’t have to provide them if they match.
Attention: You must activate the auto-deploy profile in order to install the CQ Package in CQ. The Maven Goal ‘install’ is only installing the artifact in your local maven repository.
I guess that is enough for now. We set up our own Maven project, exported our Workflow Model and installed it back into CQ. In order to place the project inside a VCS you need to follow your VCS’ instruction. I use Git to have a local / remote repository of the projects I am working on even if the client uses another VCS like Subversion or Perforce.
Final Project ∞
If you had problems following the project or need it as a base of the next article this is a ZIP file of the project at the end of this article:
Have fun – Andy
Leave a comment
You must be logged in to post a comment.

