CQ5 Workflows: Selection Dialog
Since a few years I am working with Adobe CQ (formerly Day CQ) doing mostly backend software like ETC Mapping, Link Rewriting, Dispatcher Cache handling, OSGi Services and mostly Workflows. About 1 1/2 years ago I did not know how the Workflows worked in CQ and now I am even adding additional functionality like a Dialog and Dynamic Participant Step.
Here I want to talk about how to provide a drop down box selection in a Workflow Dialog Participant Step. In order to make that work we need three parts:
- Servlet / JSP that provides an JSon Array with ‘text’ / ‘value’ pair
- Dialog Definition that contains the Drop Down Box
-
Dialog Participant Step using the Dialog Definition
Attention: There is a bug in the display of an embedded Dialog where the labels of the dialog are ignored. This is pretty annoying but the Workflow designer can add a hint into the title to make it clear what the fields are.
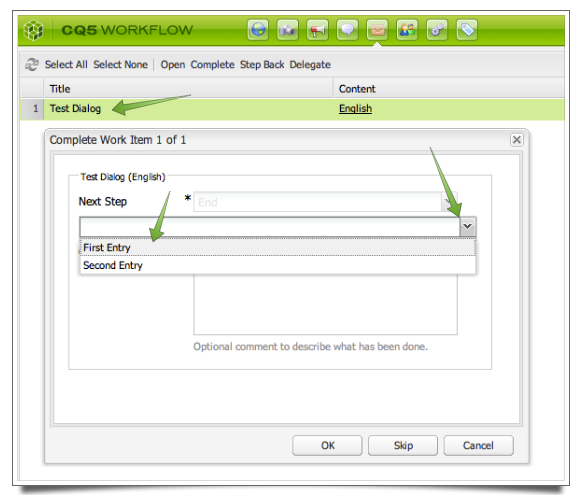
This is how the dialog will look like inside the Workflow Inbox:

Selection Data ∞
In order to provide a dynamic list to a dialog we need to have a source that provides use with a JSon Array that contains two values: text and value. Optionally you can add the property qtip which is used in the dialog to display a tooltip. This can provides by an adequate renderer or by an Servlet / JSP. Personally I think that for a workflow changes must be limited because it can cause havoc due to the hidden nature of the Workflows. But this is not the topic of this entry and so I just tell you what response is expected:
[{"text":"First Entry","value":"First Value","qtip":"First Tip"},{"text":"Second Entry","value":"Second Value","qtip":"Third Value"}]
In order for you to follow this entry we just create a dummy JSP page. In CRXDE Light go to /apps/geometrixx/components, create a folder called workflow, save it and then create a file called test.jsp. Add the the line from above as content. You can test it with link http://localhost:4502/apps/geometrixx/components/workflow/text.jsp which should provide the content from above as is.
Selection Dialog ∞
You need to create a dialog that contains the drop down box and a link to the service above providing the selection data. This is how you create the dialog:
- Create a cq:Component node named test-dialog in our workflow folder
- Create a cq:Dialog node name dialog in the component created above
- Add the property title with the value Test Dialog
- Add the property xtype with the value dialog
- Create a cq:Panel node named items in the Dialog created above
- Create a cq:WidgetCollection node named items in the Panel created above
- Create a cq:Widget node name test in the Widget Collection created above
- Add the property fieldDescription with value Test Description
- Add the property fieldLabel with value Test
- Add the property name with the value ./jcr:content/test-value
- Add the property options with the path of the selection data service /apps/geometrixx/components/workflow/text.jsp
- Add the property type with value select
- Add the property xtype with value selection
-
Save the entire thing
This is how it looks like at the end:

Workflow Model ∞
Here we just want to do the basics which only contains the Dialog Participant Step that provides the selection dialog. In a later article I will show how to use it.
- First go to the Workflow Editor (/workflow)
- Click on New and name it Dialog Test and then click OK to create the workflow
- Double click on the Workflow to bring up the Model Editor
- Remove the Step 1 participant step (right click on the box and select delete)
- In the Sidekick click on component tab, select the workflow group and look for Dialog Participant Step
- Drag it over to the Model right below the Flow Start box
- Duple click on the box and change the Title to Test Dialog
- Click on User/Group tab and enter /home/groups/a/administrators or select it through the dialog (magnifying glass)
- Click on the Dialog tag, click on the magnifying glass, select our test component and then add /dialog** at the end
- Click OK to save the changes
-
Click on Save to save the Model
Bring it to Live ∞
Now that we did all that work let’s see how it looks like when we start the workflow. For that do:
- Go to the Workflow Editor (/workflow)
- Select our Workflow (Dialog Test)
- Right click and select Start
- Select a page like /content/geometrixx/en
- Optionally add a workflow title and comment
- Go to the Workflow Inbox (/Inbox)
- Wait until our workflow appears (Test Dialog)
- Select the Entry, right-click and select Complete
-
A dialog will pop up which includes our drop down box
Selecting the down array will show our two values (what is in the text property. When hovering over the entry it will show a tooltip next to the arrow provided by the qtip property. If you click OK and then go to the page you will find the value stored in a property inside the page’s jcr:content named test-value.
Conclusion ∞
So much work for all that. Yeah, welcome to the world of CQ5 Workflows. Still if this is used later day out and day in by many users then it is still worthwhile.
This can be used now to let the user direct the future direction / action of the workflow and we will talk about this later. That said we will also talk about how to develop workflows efficiently.
Have fun – Andy
Leave a comment
You must be logged in to post a comment.

