CQ Workflow Tutorial: Extending CQ Workflows with Workflow Porcess
There are a few useful Workflow Steps available that enables you create nice Workflow Models. That said many features are not provided or are implemented badly. This is a list of features that are missing out of the box:
- Logging of the Payload, Meta Data etc
- Replication using a Particular Replication Agent
- Sending Email Notifications using a Particular Template
- Conditional Jumps
-
etc
When building a CQ Workflow Models you are adding / configuring Steps which you select on the Sidekick:
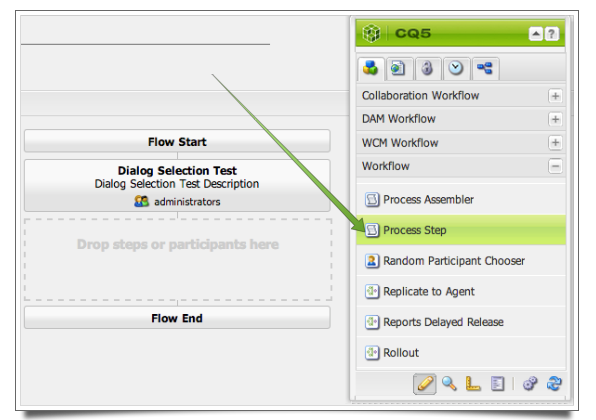
and drag them onto the Workflow Model:
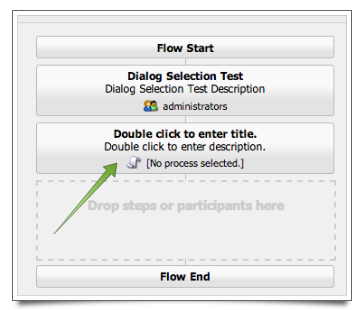
Then you double-click on the workflow step to adjust the properties:
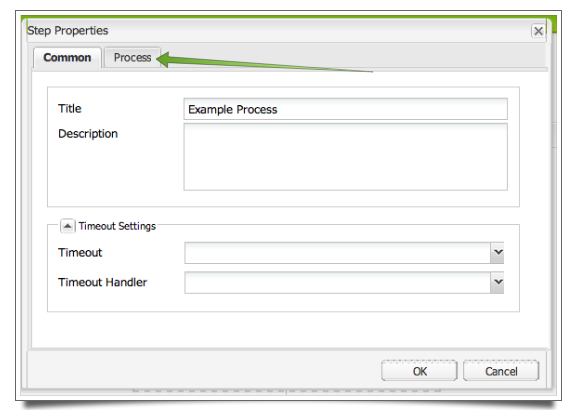
for example for the Process Step you then select the Process from the drop down box:
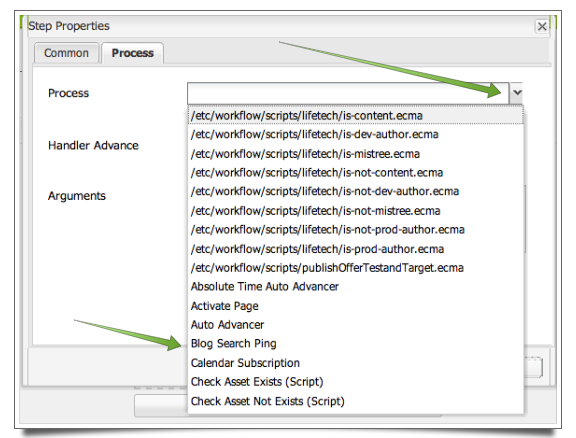
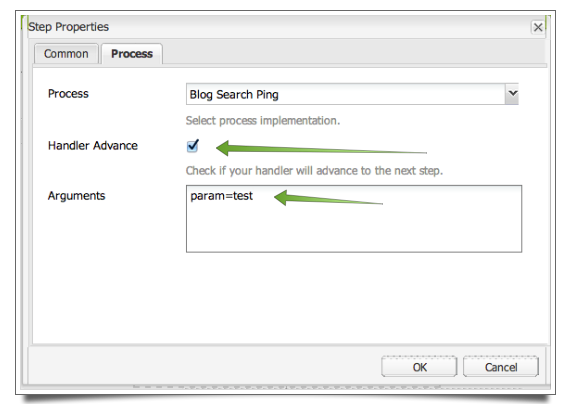
and add parameters for that step. Click on the Ok button and you will see this:
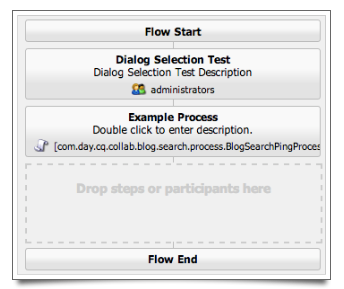
You might have noticed that there are ECMA scripts, just Scripts and unspecified processes. These unspecified process are OSGi Services that implement the WorkflowProcess interface which we will do here because Stability is key to mastering Workflows.
OSGi Services: Basics ∞
OSGi Services are the building blocks of CQ 5 and a very good way to extend / customize CQ. In the previous article about the Dialog Selection Provider Servlet I just provided the code without further explanation but here I want to cover some of the basics of OSGi Services.
Attention: OSGi does not use Java Annotations when it loads the OSGi Services but rather the Maven SRC Plugin will take the annotations and create the Service Descriptors. Still we will use Annotations to free us from dealing with JavaDocs or with the XML based Service Descriptors.
On the Class Level we will use Java Annotations to describe the service:
1 2 3 4 5 6 7 8 9 10 11 12 13 14 15 16 17 18 19 20 21 22 23 24 25 26 |
@Component( immediate = true, metatype = true )
@Service
@Properties(
    {
        @Property(
            name = "sling.servlet.paths",
            value = {
                "/bin/tutorial/workflow/test/selection"
            },
            propertyPrivate = true
        ),
        @Property(
            name = "sling.servlet.methods",
            value = { "GET", "POST" },
            propertyPrivate = true
        ),
        @Property(
            name = "service.description",
            value = "Provides Test Selection Data",
            propertyPrivate = true
        )
    }
)
public class TestSelectionDataProviderServlet
    extends SlingSafeMethodsServlet
{
|
On line 1 we describe the component, if it is started right away (immediate=true) and if the meta date are provided (metatype = true) (we will see with the runmode configuraiton what you can do with it.
On line 2 we declare this a service. Normally you would need to specify the service interface but if not provided the Maven SCR plugin will take the implemented interfaces of the class for this (or the class itself if no Interface are implemented).
On line 3 and the following we define the Service properties which normally includes the service.vendor and the service.description. For our Servlet we added the servlet methods and the servlet paths.
Next are references or service injection allowing you to get a reference to another service by its type:
1 2 |
@Reference protected MailService mMailService; |
Adding the @Reference to a member declaration and OSGi will try to inject the references into that member variable during deployment.
Attention: if a Reference is not available or not configured (like the MailService) then it will cause that Service not become active even if the Rest of the Bundle deploys successfully. Therefore it is important to always make sure that a Bundle is deployed, active and that its Services are active (listed) as well.
Finally there are three methods that deal with the life-cycle events of the Service. There is the activate, the modified and the deactivate event:
1 2 3 4 5 6 7 8 9 10 11 12 13 14 |
    @Activate
    protected void activate( ComponentContext pComponentContext ) {
        LOGGER.debug( "activate service with context: '{}'", pComponentContext );
    }

    @Modified
    protected void modified( ComponentContext pComponentContext ) {
        LOGGER.debug( "modify service with context: '{}'", pComponentContext );
    }

    @Deactivate
    protected void deactivate() {
        LOGGER.debug( "deactivate service" );
    }
|
The important point of the activate and modified event is that they can contain properties that can be used to configure the Service at runtime.
Workflow Process: Basics ∞
The Workflow Process Interface defines the contract between the Workflow Engine and the Process we declare:
package com.day.cq.workflow.exec;

import com.day.cq.workflow.WorkflowException;
import com.day.cq.workflow.WorkflowSession;
import com.day.cq.workflow.metadata.MetaDataMap;

public abstract interface WorkflowProcess
{
  public abstract void execute(WorkItem paramWorkItem, WorkflowSession paramWorkflowSession, MetaDataMap paramMetaDataMap)
    throws WorkflowException;
}
The Workflow Item is the data representation of this step. The Workflow Session is the session of that Workflow and the Meta Data Map are the properties of that Step.
Attention: There are TWO meta data maps: one for the Workflow Step and one for the entire Workflow. Only the second contains data that ‘travels’ with the workflow as its progresses which is obtain by WorkItem.getWorkflowData().getMetaDataMap() and should not be confused with the meta data map provided in the execute method.
Workflow Process: Logging ∞
The biggest hurdle of dealing with Workflows is the fact that it runs in the background and debugging is not feasible. On the other hand the logging provided by the CQ Workflow Engine is inadequate and to noisy when switched on. Therefore I cam up with a Workflow Step that will give me some basic information about the Workflow and its Meta Data. This is especially useful in Loops, Jumps and Erroneous Conditions to make sure that when a problem is reported one can view the log files and see what happened.
The basic idea is to have a single argument that contains the logging message together with some predefined placeholders like ht payload, meta data map, comment and workflow meta data map.
We want to have this class as OSGi service so we need to place this class into the Service module of our project. There we create a package called com.madplanet.cq.workflow.tutorial.basic.services.osgi.workflow where we place our class LogWorkflow:
1 2 3 4 5 6 7 8 9 10 11 12 13 14 15 16 17 18 19 20 21 22 |
package com.madplanet.cq.workflow.tutorial.basic.services.osgi.workflow;

import …

/**
 * Workflow process that deletes the given Node.
 *
 * @author Andreas Schaefer
 */
@Component
@Service
@Properties(
    {
        @Property( name = SERVICE_DESCRIPTION, value = "Log the Workflow Process." ),
        @Property( name = SERVICE_VENDOR, value = "Madplanet.com" ),
        @Property( name = "process.label", value = "Basic Tutorial: Log Workflow" )
    }
)
public class LogWorkflow
    implements WorkflowProcess
{
    private static final Logger LOG = LoggerFactory.getLogger( LogWorkflow.class );
|
Please note that we set the process.label (line 16) which is later listed when we select a Process and we make our class implement the WorkflowProcess interface. Then we need to create a SLF4J logger (line 24) because that is natively used within OSGi.
The Workflow Step Execution ∞
When a Workflow instance runs through our step the execute() method is called which is this one:
32 33 34 35 36 37 38 39 40 41 42 43 44 45 46 47 48 49 50 51 52 53 54 55 56 |
public void execute( WorkItem pItem, WorkflowSession pSession, MetaDataMap pArguments )
    throws WorkflowException
{
    LOG.info( "------------------------------ " + getClass().getSimpleName() + ".java  START ------------------------------" );
    try {
        Arguments lArguments = Arguments.parse( pArguments );
        String lMessage = lArguments.get( "message" );
        if( lMessage == null ) { lMessage = "No Message Provided"; }
        String lLogLevel = lArguments.get( "logLevel" );
        if( lLogLevel == null ) { lLogLevel = "INFO"; }
        if( "INFO".equalsIgnoreCase( lLogLevel ) ) {
            LOG.info( "\n\n{}\n\n", parsePlaceholders( lMessage, pItem, pSession, pArguments ) );
        } else if( "DEBUG".equalsIgnoreCase( lLogLevel ) ) {
            LOG.debug( "\n\n{}\n\n", parsePlaceholders( lMessage, pItem, pSession, pArguments ) );
        } else if( "TRACE".equalsIgnoreCase( lLogLevel ) ) {
            LOG.trace( "\n\n{}\n\n", parsePlaceholders( lMessage, pItem, pSession, pArguments ) );
        } else if( "ERROR".equalsIgnoreCase( lLogLevel ) ) {
            LOG.error( "\n\n{}\n\n", parsePlaceholders( lMessage, pItem, pSession, pArguments ) );
        } else if( "WARN".equalsIgnoreCase( lLogLevel ) ) {
            LOG.warn( "\n\n{}\n\n", parsePlaceholders( lMessage, pItem, pSession, pArguments ) );
        }
    } finally {
        LOG.info( "------------------------------ " + getClass().getSimpleName() + ".java  END -------------------------------" );
    }
}
|
First we parse (line 37) the given Meta Data Map of the Workflow Step to obtain the message (line 38) and the logLevel (line 40). Then we log the parsed message based on the given log level.
Meta Data Map Parsing ∞
In a Workflow Process the single argument is provided as PROCESS_ARGS. In order for us to provide multiple values we provide a comma separated key-value pair list. So we place that in an external class Arguments that will do the parsing and provides its data in a Map which by default is case-insensitive on the key:
public class Arguments {

    public static final String PROCESS_ARGS = "PROCESS_ARGS";

    private Map<String,String> mArguments = new HashMap<String, String>();
    private boolean mWithCase = false;

    public static Arguments parse( MetaDataMap pArguments ) {
        return parse( pArguments, false );
    }

    public static Arguments parse( MetaDataMap pArguments, boolean pWithCase ) {
        Arguments lReturn = parse( pArguments.get( PROCESS_ARGS, "" ), pWithCase );
        for( String lKey: pArguments.keySet() ) {
            if( !PROCESS_ARGS.equals( lKey ) ) {
                String lValue = pArguments.get( lKey,  String.class );
                if( lValue != null && lValue.trim().length() > 0 ) {
                    if( lReturn.mWithCase ) {
                        lReturn.mArguments.put( lKey, lValue );
                    } else {
                        lReturn.mArguments.put( lKey.toLowerCase(), lValue );
                    }
                }
            }
        }
        return lReturn;
    }

    public static Arguments parse( String pValue ) {
        return parse( pValue, false );
    }

    public static Arguments parse( String pValue, boolean pWithCase ) {
        pValue = pValue == null ? "" : pValue;
        String[] lParts = pValue.split( "," );
        Arguments lReturn = new Arguments();
        lReturn.mWithCase = pWithCase;
        for( String lPart: lParts ) {
            String[] lTokens = lPart.split( "=" );
            if( lTokens.length == 2 ) {
                if( lReturn.mWithCase ) {
                    lReturn.mArguments.put( lTokens[ 0 ], lTokens[ 1 ] );
                } else {
                    lReturn.mArguments.put( lTokens[ 0 ].toLowerCase(), lTokens[ 1 ] );
                }
            } else if( lTokens.length == 1 ) {
                if( lReturn.mArguments.containsKey( "" ) ) {
                    throw new IllegalArgumentException(
                        "Only one default (no-key) value is permitted." +
                            " Already have this value: '" + lReturn.mArguments.get( "" ) +
                            "' and not got this value: '" + lTokens[ 0 ] + "'"
                    );
                } else {
                    lReturn.mArguments.put( "", lTokens[ 0 ] );
                }
            }
        }
        return lReturn;
    }
…
Message Parsing ∞
The log message would not make sense if we could not log parts of the message internals. We have the two Meta Data Maps, the Payload, Start Comment and the Arguments instance. The user can add keywords enclosed with ‘{}’ to indicate these placeholders and we will parse and replace them:
    private String parsePlaceholders( String pMessage, WorkItem pItem, WorkflowSession pSession, MetaDataMap pArguments ) {
        int lStart = -1;
        String lReturn = "";
        int lEnd = -1;
        while( true ) {
            lStart = pMessage.indexOf( "{", lStart + 1 );
            if( lStart >= 0 ) {
                lReturn += pMessage.substring( lEnd + 1, lStart );
                lEnd = pMessage.indexOf( "}", lStart );
                if( lEnd > lStart ) {
                    String lName = pMessage.substring( lStart + 1, lEnd ).toLowerCase();
                    String lValue = null;
                    if( "payload".equals( lName ) ) {
                        WorkflowData lWorkflowData = pItem.getWorkflowData();
                        Object lPayload = lWorkflowData != null ? lWorkflowData.getPayload() : null;
                        if( lPayload != null ) {
                            lValue = "Payload: " + lPayload;
                        } else {
                            lValue = "Payload: is not found";
                        }
                    } else if( "arguments".equals( lName ) ) {
                        lValue = "Arguments: " + toString( pArguments );
                    } else if( "meta".equals( lName ) ) {
                        LOG.trace( "Meta Data Map: {}", pItem.getMetaDataMap() );
                        LOG.trace( "Meta Data Map Comment: {}", pItem.getMetaDataMap().get( "comment", String.class ) );
                        lValue = "Meta: " + toString( pItem.getMetaDataMap() );
                    } else if( "comment".equals( lName ) ) {
                        Workflow lWorkflow = pItem.getWorkflow();
                        WorkflowData lWorkflowData = lWorkflow != null ? lWorkflow.getWorkflowData() : null;
                        MetaDataMap lMetaDataMap = lWorkflowData != null ? lWorkflowData.getMetaDataMap() : null;
                        if( lMetaDataMap != null ) {
                            lValue = "Comment: " + pItem.getWorkflow().getWorkflowData().getMetaDataMap().get("startComment", String.class);
                        } else {
                            lValue = "Comment: No Meta Data Map found";
                        }
                    } else if( "wf-data-meta".equals( lName ) ) {
                        Workflow lWorkflow = pItem.getWorkflow();
                        WorkflowData lWorkflowData = lWorkflow != null ? lWorkflow.getWorkflowData() : null;
                        MetaDataMap lMetaDataMap = lWorkflowData != null ? lWorkflowData.getMetaDataMap() : null;
                        if( lMetaDataMap != null ) {
                            lValue = "WF Data Meta: " + toString( pItem.getWorkflow().getWorkflowData().getMetaDataMap() );
                        } else {
                            lValue = "WF Data Meta: No Meta Data Map found";
                        }
                    }
                    LOG.trace( "Value: " + lValue );
                    if( lValue != null ) {
                        lReturn += lValue;
                    } else {
                        lReturn += "'placeholder unknown'";
                    }
                } else {
                    // No End Bracket found so add the rest and exit
                    lReturn += pMessage.substring( lStart );
                    break;
                }
            } else {
                // No Start Bracket found so add the rest and exit
                if( pMessage.length() > lEnd ) {
                    lReturn += pMessage.substring( lEnd + 1 );
                }
                break;
            }
        }
        return lReturn;
    }
Installation and Application ∞
To install the Workflow Step we just need to build and install the OSGi bundle with Maven:
mvm clean install -P auto-deploy
If you like me run into dependency problems you need to create that settings.xml file and either add it to you .m2 folder or specify it in the maven call with the -s option:
<?xml version="1.0" encoding="UTF-8"?>
<settings xmlns="http://maven.apache.org/SETTINGS/1.0.0"
          xmlns:xsi="http://www.w3.org/2001/XMLSchema-instance"
          xsi:schemaLocation="http://maven.apache.org/SETTINGS/1.0.0 http://maven.apache.org/xsd/settings-1.0.0.xsd">

    <profiles>
      <profile>
		<id>cq</id>
		<activation>
			<activeByDefault>true</activeByDefault>
		</activation>
		<repositories>
			<repository>
				<id>adobe</id>
				<name>Adobe Repository</name>
				<url>http://repo.adobe.com/nexus/content/groups/public/</url>
				<releases>
					<enabled>true</enabled>
				</releases>
				<snapshots>
					<enabled>false</enabled>
				</snapshots>
			</repository>
		</repositories>
		<pluginRepositories>
			<pluginRepository>
				<id>adobe-plugins</id>
				<name>Adobe Plugin Repository</name>
				<url>http://repo.adobe.com/nexus/content/groups/public/</url>
				<releases>
					<enabled>true</enabled>
				</releases>
				<snapshots>
					<enabled>false</enabled>
				</snapshots>
			</pluginRepository>
		</pluginRepositories>
	</profile>
	<profile>
		<id>cqblueprints</id>
		<activation>
			<activeByDefault>true</activeByDefault>
		</activation>
		<repositories>
			<repository>
				<id>cqblueprints.releases</id>
				<name>CQ Blueprints Release Repository</name>
				<url>http://dev.cqblueprints.com/nexus/content/repositories/releases/</url>
				<releases>
					<enabled>true</enabled>
				</releases>
				<snapshots>
					<enabled>false</enabled>
				</snapshots>
			</repository>
		</repositories>
		<pluginRepositories>
			<pluginRepository>
				<id>cqblueprints.plugins.releases</id>
				<name>CQ Blueprints Plugin Release Repository</name>
				<url>http://dev.cqblueprints.com/nexus/content/repositories/releases/</url>
				<releases>
					<enabled>true</enabled>
				</releases>
				<snapshots>
					<enabled>false</enabled>
				</snapshots>
			</pluginRepository>
		</pluginRepositories>
	</profile>
  </profiles>

</settings>
Setup of the Workflow Process Step ∞
First make sure that you bundle is deployed and up and running including the LogWorkflow service:
1) Go to the OSGi console (/system/console/bundles)
2) Sort by Id descending (highest number first)
3) Our bundle should be one of the first:
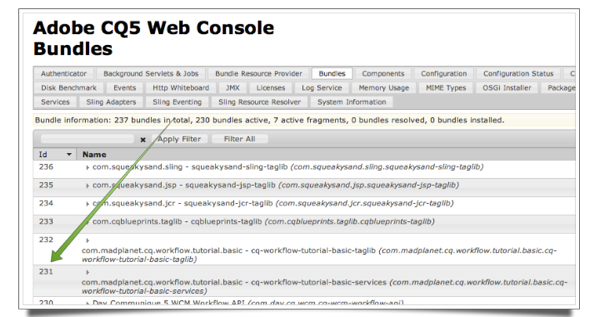
4) Click on our bundle and scroll down until you see our LogWorkflow service

Now we are ready to go to our Basic Workflow and edit it:
5) Go to the Workflow Console (/workflow)
6) In Models double-click on the Basic Workflow
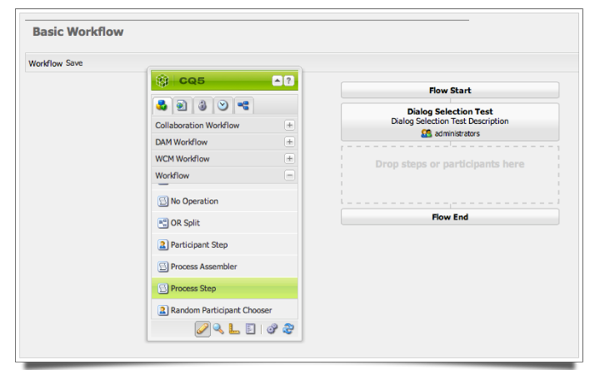
7) In the Sidekick go to Components and select the Workflow group
8) Drag the Process Step onto the Dialog Participant Step so that it is added in front of it
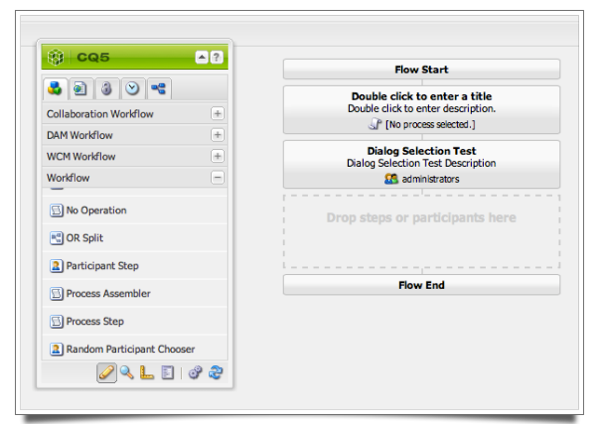
9) Double Click or Right-Click on Step Box to bring up the Edit Dialog. Enter Title and optionally the Description
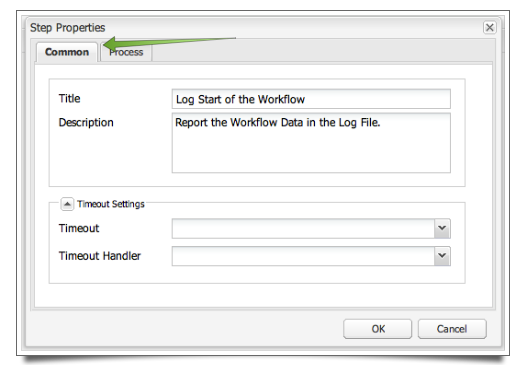
10) Now we can move to the Process tab and click on the Drop Down Box to select the process
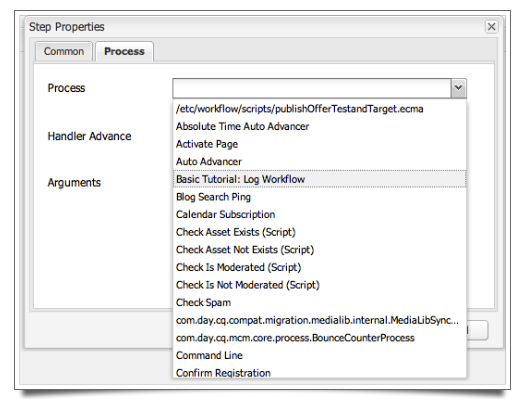
Attention: as you can see the Process Label of the OSGi Service is listed in this Drop Down Box
11) Make sure that the Handler Advances automatically and enter as Arguments the log level and message
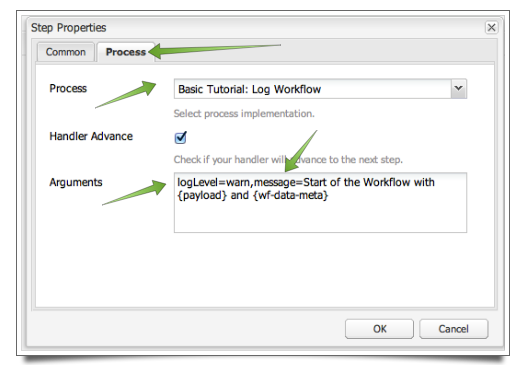
12) Click on the OK button to finish the Editing
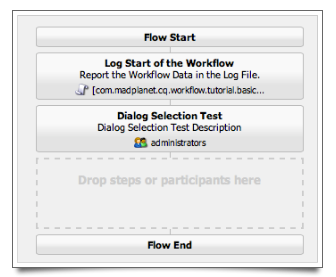
13) Important: click on the Save button on the top-left to rebuild the Workflow Model otherwise CQ 5.5 will run the Old Workflow.
Execute and View the Results ∞
Now we can run the Workflow and see the result. In a default installation you will find the Log Messages in the crx-quickstart/logs/cq-workflow-tutorial-basic.log file. So go back to the Models in the Workflow Consoles, click on the Basic Workflow, right-click and select start. Enter a path to a page and hit OK to start the workflow:
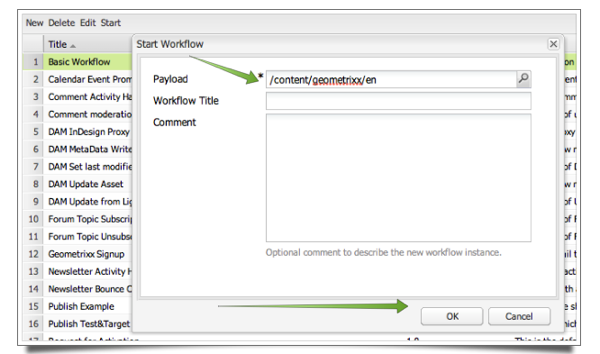
and you will see this in the log file:
2013-03-23 15:23:14.800 INFO [com.madplanet.cq.workflow.tutorial.basic.services.osgi.workflow.LogWorkflow] ------------------------------ LogWorkflow.java  START ------------------------------
2013-03-23 15:23:14.815 WARN [com.madplanet.cq.workflow.tutorial.basic.services.osgi.workflow.LogWorkflow]

Start of the Workflow with Payload: /content/geometrixx/en and WF Data Meta: {
currentJobs = 'VolatileWorkItem_node1_etc_workflow_instances_2013-03-23_model_1364077394582769000', type: String
workflowTitle = '', type: String
startComment = '', type: String }


2013-03-23 15:23:14.815 INFO [com.madplanet.cq.workflow.tutorial.basic.services.osgi.workflow.LogWorkflow] ------------------------------ LogWorkflow.java  END -------------------------------
Voila, we have our first Workflow Step created and executed.
Conclusion ∞
When I started to develop my first Workflow Steps it soon became obvious that creating Process Step are tedious and error prone. First I had to make sure I selected the correct process, add the correct arguments and had no help from the UI / Dialog. So I started to wonder how to create my very own workflow steps that you could select on the Sidekick as you do for the ones from CQ. We will talk about this in a future article.
Another thing is that I had to specify the Log Level inside the Workflow like you normally do for code. That said it might be desirable if one could change the Log Level during runtime and maybe even per Workflow. This can be accomplished using the Runmode Configuration / OSGi Console. We will talk about this in a future article as well.
Final Project ∞
If you had problems following the project or need it as a base of the next article this is a ZIP file of the project at the end of this article:
cq-workflow-tutorial-basic.log.workflow.process.zip
Attention: I changed the name of the root POM and so you must first do a mvn clean install on the root folder before going on.
Have fun – Andy
Leave a comment
You must be logged in to post a comment.

