Using Embedded Lion Server PostgreSQL Database
One of the new features of Mac OS X Lion Server is that Apple replaced MySQL with PostgreSQL as internal database server. The drawback is that it is not easy accessible by default. Here I want to show you what to do and how you can manage it.
Attention: if you want to use the PostgreSQL server from EnterpriseDB then I would strongly recommend to make a backup of your server because if it fails the uninstallation might corrupt your embedded PostgreSQL server. Yesterday, August 4th 2011, I installed Enterprise DB’s server and because it did not start I uninstall it but then my embedded server was corrupted as well. Now this might be just an issue with the startup script but nevertheless I lost the DB. It seems that the installation from Enterprise DB is not compatible with Lion and so I wouldn’t use until they provide one that is. Their own recommendation is to use the embedded server instead.
When you installed the Lion Server then you can use ps -ef in order to see if PostgreSQL is running:
bash-3.2# ps -ef | grep post
216   468     1   0  8:33AM ??         0:00.13 /usr/bin/postgres -D /var/pgsql -c listen_addresses= -c log_connections=on -c log_directory=/Library/Logs -c log_filename=PostgreSQL.log -c log_lock_waits=on -c log_statement=ddl -c log_line_prefix=%t  -c logging_collector=on -c unix_socket_directory=/var/pgsql_socket -c unix_socket_group=_postgres -c unix_socket_permissions=0770
You can get some more information about the service with that:
sudo serveradmin list
...
pcastlibrary
postgres
radius
...
and some more details:
sudo serveradmin fullstatus postgres
postgres:dataDirHasBeenInitialized = yes
postgres:PG_VERSION = "9.0.4"
postgres:dataDir = "/var/pgsql"
postgres:postgresIsResponding = yes
postgres:dataDirIsDirectory = yes
postgres:PGserverVersion = 90004
postgres:dataDirExists = yes
postgres:setStateVersion = 1
postgres:state = "RUNNING"
So far so good. Now if we try to connect to the DB using telnet:
telnet localhost 5432
we see that there is no socket listening which means that PGAdmin cannot be used to administer the server nor can it be used by a JDBC driver. If you look above in the process description you will see an option called listen_addresses which is empty. Maybe if we could set our server address there we might be able to connect.
Initially I found the original PostgreSQL server configuration file under /var/pgsql/postgresql.conf but that did not do the trick. Knowing a little bit about Mac internals I started to look for a file inside /System/Library with the name postgres in it. So I found the file: /System/Library/LaunchDaemons/org.postgresql.postgres.plist. This file has an array of properties including the listen addresses:
<?xml version="1.0" encoding="UTF-8"?>
<!DOCTYPE plist PUBLIC "-//Apple//DTD PLIST 1.0//EN" "http://www.apple.com/DTDs/PropertyList-1.0.dtd">
<plist version="1.0">
<dict>
	<key>Disabled</key>
	<true/>
	<key>GroupName</key>
	<string>_postgres</string>
	<key>Label</key>
	<string>org.postgresql.postgres</string>
	<key>OnDemand</key>
	<false/>
	<key>ProgramArguments</key>
	<array>
		<string>/usr/bin/postgres</string>
		<string>-D</string>
		<string>/var/pgsql</string>
		<string>-c</string>
		<string>listen_addresses=</string>
		<string>-c</string>
		<string>log_connections=on</string>
		<string>-c</string>
		<string>log_directory=/Library/Logs</string>
		<string>-c</string>
		<string>log_filename=PostgreSQL.log</string>
		<string>-c</string>
		<string>log_lock_waits=on</string>
		<string>-c</string>
		<string>log_statement=ddl</string>
		<string>-c</string>
		<string>log_line_prefix=%t </string>
		<string>-c</string>
		<string>logging_collector=on</string>
		<string>-c</string>
		<string>unix_socket_directory=/var/pgsql_socket</string>
		<string>-c</string>
		<string>unix_socket_group=_postgres</string>
		<string>-c</string>
		<string>unix_socket_permissions=0770</string>
	</array>
	<key>UserName</key>
	<string>_postgres</string>
</dict>
</plist>
Adding our IP address there:
listen_addresses=127.0.0.1
saving the file and restarting the server:
sudo serveradmin stop postgres
sudo serveradmin start postgres
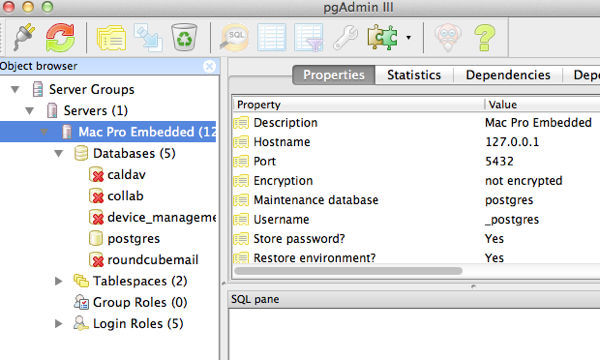
did the trick. Now I could download and install PGAdmin and connect to the server using the user _postgres and my password (the original administrator):

Cheers – Andy Schaefer
Upgrade my Mac OS X Server to Lion
Attention: this blog entry is in reverse order meaning the task started at the bottom and I’ll add updates on top of it
Fri Aug 12: Today wa the day where I pulled the plug from our Snow Leopard server taking it from the Internet. I did that to make sure that any new mails sent will not be received until the migration is done otherwise I might loose some of the emails. Then I also wanted to make sure that I don’t loose any changes to the web sites like comments etc.
So after the Server was taken from the Internet I exported the Mail DBs, the MySQl (WordPress) and PostgreSQL (XWiki) DBs and copied them onto another drive. The last step of the preparation was to make a SuperDuper copy and test the copy by booting from it. This way I was sure that I could recover the server in case of big problems and or if I needed to export more data. After I rebooted into the SuperDuper copy I also used it to reformat the original server disk by earsing it with the Disk Utility and then start the Lion installation. It turned out that I still needed an Internet connection but because I have a strange double router setup for the server I was able to connect the server to the Verizon router which prevented the Mac Mini to be identified as server. So I could install Lion and after that was finished the Lion Server and Lion Server Administration tools. After I installed some necessary programs like Dropbox, 1Password, pgAdmin3, MySQL and MySQL Workbench as some others and added the localhost as interface to the embedded PostgreSQL I restarted the box the first time.
The first problems I encountered was some issues with the SSL certificates but eventually I could generated a self-signed certificate and import it to the server. Then I ran into issues with Mail and DNS. Eventually I had to setup DNS step by step. First the local server definition, then the machine, than the aliases etc. And between each step using nslookup to verify everything fine. After all was setup I went ahead and setup the Mail server. Copy over the original Mail DB was that difficult after I figured out that I had to take about all the “.” directories by copying with “cp .*” because a “cp *” would not find and copy the “.” directories. Then I also had to make sure that all files had the ownership “_dovecot:mail” otherwise mail would ignore them. Eventually I got Mail up and running and the old mailboxes copied over. Still there is one thing that doesn’t work. I cannot use SSL with the Mail server and so I can only use Mail inside our home to prevent people from snooping on our mails.
Copying, installing and configuring the web sites was a breeze including the import of the MySQL and PostgreSQL DBs. This was done in less than 2 hours.
There are few things to do like installing Subversion and Subersion server, Gitolite server, Time Machine drive and some file shares but that is purely internal stuff and can be done when needed. Good thing there is that I have a life copy of the server on the SuperDuper backup and so I can check how it was done then and copy necessary files over.
I guess that concludes this post except I ran into some important issues or when I could figure out why Mail doesn’t support SSL for now
.
Tues Aug 9: Yesterday I manage to migrate over my Snow Leopard Mail DBes. It seems that the data structure is compatible and the only thing that I had to adjust is the user (moved to ‘_dovecot’). The rest was just sending one email to myself to create the user DB, then shutdown the mail service and copy over the data. After a restart the mail was available. There was one little thing where sub mail boxes where not handled properly but a many copy of these directories did fix the issue.
Today then I was able to install MySQL (just use 5.5.1 for Snow Leopard) and export / import the PostgreSQL and MySQL databases without any problems. Finally the website were easy as pie. Just tar up the directories in question (Jetty and wordpress), install on Lion Server and restart.
Next step is to actually do the migration. So first take it from the Net (not to loose any mails etc), then backup with SuperDuper, export the Mail DBs and regular Databases and export them onto an external drive. After reformatting the server’s drive I can install Lion, Lion Server, Lion Server Admin tools and the additional programs like Dropbox, 1Password, PathFinder, SuperDuper, MySQL, MySQL Workbench, PgAdmin3 and Java (triggering with ‘java -version’ on command line). After that I need to setup DNS, Mail and Web Sites, import the data and test it. I expect that DNS / Mail to give me some grief (as it always did) but on a late evening / nite shift that should be done. So see you on there other side.
Sun Aug 7: I came up with a plan to test the migration and to make sure that I can export / import the DB and Mail data before doing the actual upgrade. So I am taking my laptop, install OS X Lion Server on it and start the migration process. This includes the setup of the server so that it works the same way as my current Snow Leopard server. The only thing that I am going to drop is to use managed clients feature because that wasn’t worth the time I invested into.
I did figure out how to use the embedded PostgreSQL server of the Lion Server and it turned out that I cannot use the installation from Enterprise DB because it doesn’t work and the uninstallation does corrupt the internal PostgreSQL DB. Not good.
This will be a post in progress because the upgrade of the server will take a week or two. As soon as I learned how the OS X Lion Server was distributed I bought the Server App from the App Store. Compared to the original $1,000 (for Leopard) and $500 (for Snow Leopard) this time the server was cheap around $50. So I was ready to test it on one of my developer partion.
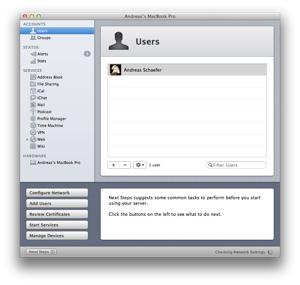
The first thing that I saw when I fired up the Sever is that the list of services where limited:
For me the most important thing was the missing DNS and Open Directory service and the limited functionality for the Web and Mail. So I went on the Internet to see if I missed some settings or flags but it turned out that one can download the good old OS X Server Admin tools which provides the missing services and the Mail configuration. Still need to figure out how to setup Apache sites I did on Snow Leopard Server. Because I don’t want the server to be down for too long I probably go ahead and use my Laptop and an external drive to create a server clone. When this one is up and running as expected I know what to do. Then I will shutdown the server, install Lion OS and the Server, copy over the necessary data (PostgreSQl DBs, Mail, Web Applications etc) and finally bring the server back to life.
– Andy
GitoLite: Your very own Git Server on Mac OS X Server
GitoLite is a simple Git server that can handle user authentication per project / branch. Even though I don’t mind too much to shell out $300 bucks for a simple business plan with GitHub I want to keep my code closer to my heart that anything else. Even though I don’t think that my server is tightly protected it is at least my fault when something goes wrong. Lately there have been reports of nasty security breaches on user data servers and even Dropbox had their account unprotected for a few hours.
The first thing I was surprised of was the fact that there is no out-of-the-box git server available as it is with Subversion. Then I tried Gitosis but ran into issues with Python and abandoned that. Later I heard about GitoLite which gave me some grief at the beginning but eventually I could make it work out. The trick was to make sure that I was focuses on the task and made sure only to proceed if the previous step worked out.
Update: I copied this documentation to my XWiki.


