

Markdown, Syntax-Colored Source Code
In this post I want to see if I can use Markdown and Blog Text in order to have syntax colored source code.
Source Code
This is an inner Java Class:
private static class LogLevelConfig {
    private LogLevel mLogLevel;
    private Pattern mModelIdGlobPattern;
    private Pattern mModelTitleGlobPattern;

    public LogLevelConfig( String pModelIdGlob, String pModelTitleGlob, String pLogLevel ) {
        if( pLogLevel == null || pLogLevel.trim().length() == 0 ) {
            mLogLevel = LogLevel.debug;
        } else {
            try {
                mLogLevel = LogLevel.valueOf( pLogLevel );
                LOG.info( "activate(), given log level found: {}", mLogLevel );
            } catch( Exception e ) {
                throw new IllegalArgumentException( "no log level found for: '" + pLogLevel + "'" );
            }
        }
        if( pModelIdGlob != null && pModelIdGlob.trim().length() > 0 ) {
            mModelIdGlobPattern = Pattern.compile( pModelIdGlob );
        }
        if( pModelTitleGlob != null && pModelTitleGlob.trim().length() > 0 ) {
            mModelTitleGlobPattern = Pattern.compile( pModelTitleGlob );
        }
    }

    public LogLevel getLogLevel() {
        return mLogLevel;
    }

    public boolean matchWorkflowModel( WorkflowModel pWorkflowModel ) {
        boolean lReturn = true;
        if( mModelIdGlobPattern != null ) {
            lReturn = mModelIdGlobPattern.matcher( pWorkflowModel.getId() ).matches();
        }
        if( mModelTitleGlobPattern != null ) {
            lReturn &= mModelTitleGlobPattern.matcher( pWorkflowModel.getTitle() ).matches();
        }
        return lReturn;
    }
}
This is now the same code in Markdown:
private static class LogLevelConfig {
    private LogLevel mLogLevel;
    private Pattern mModelIdGlobPattern;
    private Pattern mModelTitleGlobPattern;

    public LogLevelConfig( String pModelIdGlob, String pModelTitleGlob, String pLogLevel ) {
        if( pLogLevel == null || pLogLevel.trim().length() == 0 ) {
            mLogLevel = LogLevel.debug;
        } else {
            try {
                mLogLevel = LogLevel.valueOf( pLogLevel );
                LOG.info( "activate(), given log level found: {}", mLogLevel );
            } catch( Exception e ) {
                throw new IllegalArgumentException( "no log level found for: '" + pLogLevel + "'" );
            }
        }
        if( pModelIdGlob != null && pModelIdGlob.trim().length() > 0 ) {
            mModelIdGlobPattern = Pattern.compile( pModelIdGlob );
        }
        if( pModelTitleGlob != null && pModelTitleGlob.trim().length() > 0 ) {
            mModelTitleGlobPattern = Pattern.compile( pModelTitleGlob );
        }
    }

    public LogLevel getLogLevel() {
        return mLogLevel;
    }

    public boolean matchWorkflowModel( WorkflowModel pWorkflowModel ) {
        boolean lReturn = true;
        if( mModelIdGlobPattern != null ) {
            lReturn = mModelIdGlobPattern.matcher( pWorkflowModel.getId() ).matches();
        }
        if( mModelTitleGlobPattern != null ) {
            lReturn &= mModelTitleGlobPattern.matcher( pWorkflowModel.getTitle() ).matches();
        }
        return lReturn;
    }
}
How I did it
First I must make sure that Markdown is ignoring my Blog Text Code snippet by enclosing the entire Code into a <div> block and then use the Blog Text syntax to define the code block which is are 3 cutely brackets together with the attribute lang defining the source code language for the Syntax Coloring. When I wanted to display the Markdown version of the Source Code I had to use the Blog Text No-Parse tags (two curly brackets followed by two exclamation marks). But if I use Blog Text then I will use only Blog Text for source code and not both.
The only downside of that all is that Markdown preview displays just a blob of text. Still the code is not infused with HTML making it impossible to read and without the additional work to convert the code every time to HTML.
— Andy
Pebble: Review and Outlook
A few weeks back I received the highly anticipated Pebble Watch which I backed through Kickstarter. Since then I am using it all the time even though Pebble is not yet living up to its own promises. On the other hand I have a lot of respect for the Pebble team and what they accomplished so far. To have so much success and then deliver is not easy and requires a lot of work as well as business skills to just survive the onslaught.
Later I heard Dan Bejamin from 5By5 giving a review of the Pebble on Amplified #51 and I was a little disappointed by Dan’s comments because they sounded more like a spoiled brat rather than an adult even though being a spoiled brat seems to be much of the mantra lately in the tech press. For me a comment like I want more is treating the Pebble team like Apple, Google or Samsung but the reality is that Pebble does not have a multi-million R&D budget where it can just hire a bunch of developers to push the development. This is the bleeding-edge of technology and so we need to ask ourselves if we could do it better.
The Good
That said I think the watch should be reviewed and should voice our expectations so that we can push the technology forward. So this is what I liked about the Pebble Watch:
- Many different Watchfaces which can be easily exchanged.
- Vibrating on incoming Call or SMS. This way I will never miss a call.
- Easy to manage music. This is nice when I have my Bluetooth Headset on and I can pause the music right away.
- Waterproof
- Magnet-Connected USB Charging Cable. Easily to Connect.
The Bad
Many of the bad items are things that I think will be solved soon and otherwise might need creative thinking due to limitation with iOS.
- No Battery Indicator except the Battery is Low or when it is fully charged
- Magnet-Connected USB Cable does easily disconnect and this is hard to discover
- Battery Charge lasts less than 7 days.
- No Apps so far (Golf, Biking etc).
- Email Notification is not working for me.
Improvements
For example the battery indicator does not have to be on watch per se but I could be placed on the Pebble App instead. I also would like to receive a Notification on my iPhone when the Pebble watch disconnects from the Charging Cable and also when the Pebble is fully charged. Another thing I would like is to be able to call one of my favorite phone numbers. I know you can do this with Siri but my English accent does not go well with Siri and most of the time I cam better off taking my phone out and select the number manually. Another think I would like it to use my Pebble together with a Gym Log App where I can use the Pebble to see what is the next exercise / machine, the weight and let me know when to start the next repetition and tell the App when it is over.
Conclusion
Yes, the marketing of Pebble was and still is way ahead of the gadget. On the other hand this is a gadget by a small team and until there is another gadget like this is out we cannot compare it. Pebble is released early, maybe too early, but this has more to do with the funding through Kickstarter, its overwhelming success and the ensuing balancing act between initial success, demand after release and how to mange the business. The Pebble team could have hired a lot of additional people but that would have drained their reserve making it difficult to react to competitors. So I think that the Pebble team decided to focus on the SDK to advance the Watch rather than to create a few Apps even if that meant the Watch looks now limited.
— Andy
Moving Home of this Site
Since a while I am contemplating to move away from Bluehosst.com because of various issues but mostly because I am having issues with connecting to the Mail Server from time to time and this is plain annoying. A little bit of an effort on their site would made have stayed but I got more or less no help.
A New Web Site Host
Since I started looking I never found a good host. Next week my hosting at Bluehost.com was up for renewal and so I was finally forced to act. Initially I tried out Squarespace.com but their support of handling Source Code was not really good and neither Markdown nor BlogText was really supported and I was not inclined to use a special text component to display source code.
So last Week I got a notice from my registrar Register4Less that they offer Web Hosting that would fit my need. Because time was of the essence I ordered their hosting for a year. Then I wrote down what had to be done to move:
- Backup WordPress using the Dropbox backup
- Upgrade WordPress to the latest version
- Download the WordPress files from Bluehost
- Export the DB using phpAdmin
- Uploading the WordPress files to Register4Less
- Create the MySQL DB
- MySQL Admin and WordPress User and give them the right permissions
- Import the WordPress Export
- Change my local /etc/hosts to test
- Test the WordPress Site
- Undo the /etc/hosts changes
- Create the Email Accounts
- Transfer the Emails using imapsync using MacPorts
- Testing the Emails on the new Server
- Create / Adjust the DNS Settings at Register4Less
- Change the DNS Name Servers at Register4Less for my Domain
- Test the Life WordPress Site and Email Server
I expected that this would take the entire weekend to accomplish. But because the setup at Bluehost and Register4Less are so similar (both use Linux, cPanel, FTP etc) I was done within about 9 hours which is lightning fast.
Pitfalls
The first problem I caused myself was when I through that I had to change the Domain Name inside the WordPress DB records until I realized that using /etc/hosts was much easier. Then I had some issues with imapsync and because I did not want to pollute my Mac Box I used a VMware Fusion virtual machine to install MacPort and imapsync. It was slower but if anything went wrong because of the MacPorts etc I could just ditch the virtual machine. At the end everything ran smoothly and straight forward. Finally the change of the DNS entries took some time because of an initial misconfiguration and then I had to wait until the previous settings finally expired (3h TTL).
Result
Best result is if nobody would notice and so far I looks good based on my initial smoke screen tests. I am still expecting some issues but so far I was impressed how easy and fast it was. WordPress, MySQL / phpAdmin and cPanel are really easy to do a move like that. Let’s cross our fingers that the Mail Server problems are a thing of the past to make the effort worthwhile.
At the end I want to thank Dough from the Register4Less Support team for his help otherwise this would have been a way longer story.
— Andy Schaefer
CQ Workflow Tutorial: Workflow Step Dialogs
Attention: This article is written in Markdown and so I will look different. This is a test and if the deminished look is too bad then I will convert it back to Blogtext.
In the last Article of this Tutorial we were looking into how to create our own Workflow Process but then we used the Process Step inside the Workflow Model to execute it in our Workflow. As the other Workflow Steps inside the Sidekick:
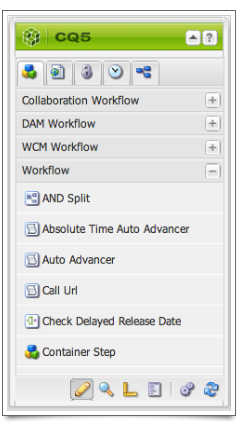
it would be nice and cool if we could make our Workflow Process appear as Step inside the Sidekick and with it to have our own dialog where the arguments are nicely presented. Digging around inside the CQ’s /libs folder I eventually found the out-of-the-box Workflow Steps and after some trial-and-error I figured out how to make it work. The only tricky part is to make sure that the absolute link to the process arguments is correct otherwise the arguments will not appear.

Markdown, Quotes and Source
Another little thing that I did not know about Markdown is to write quotes and source code.
In all IT there is always someone smarter than the smartest one you know
and always someone dumber than the dumbest one.Me
Here is some Java code:
public class Test {
    public statif voir main( String[] pArguments ) {
        // doing nothing as usual
    }
}
Have fun – Andy
Markdown and Images
As mentioned before I am still figuring out how to make Markdown work with MarsEdit and my WordPress blog. The last big issue is how to deal with images. Images in Markdown are simple by just adding an exclamation mark in front of the Image URL.
There is an 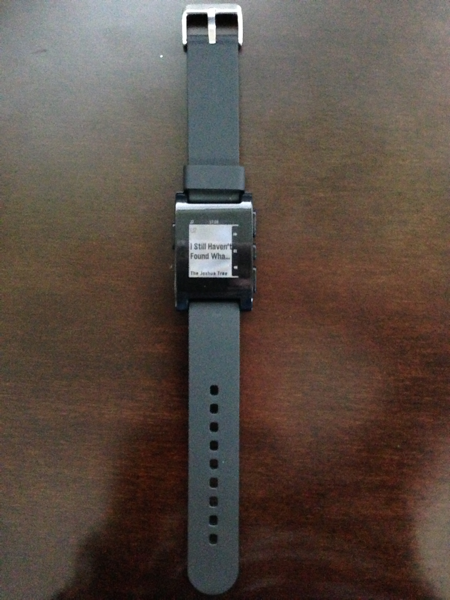 which is got last week.
So far the workflow was:
-
Open MarsEdit
-
Open Media Manager of MarsEdit (not really necessary but helpful)
-
Open Upload Utility
-
Drag an Image from the Media Manager onto the Upload Utility
-
Adjust the properties and upload the file
-
Go to WordPress, Media Library and obtain the URL to the image
-
Add it the post
It would be nice tough if MarsEdit could do everything from within the Media Manager. On the Media Manager below the Image properties should be a button to upload the image and on then on the Published Image there should be a right-click context menu entry that would provide the URL for it. That would make it a two step process.
Cheers – Andy
First Step with Markdown
Update: after making the decision to go with Markdown and installing Markdown on Save Improved Plugin for Workdpress it was pretty easy. The only thing to remember is to add two spaces at the end of a paragraph to end that paragraph and not to forget to add the reference links at the end of the document. I could also preview the page as formatted Page in the MarsEdit Preview Page when selection the Markdown Filter at the bottom.
After buying and reading MacSparky’s Field Guide to MarkDown I wanted to see how difficult it is to use Markdown together with MarsEdit to write my posts and WordPress on Madplanet.com. There are few things that I am not sure if it works:
1) Using Markdown on future Posts but using Blogtext on my older Posts
2) Using Links within a Post
3) Displaying Source Code
4) Integrating Images
So far I am pretty happy if I just can use Markdown for simple posts now and later us it more advanced posts or tutorials.
Cheers – Andy
CQ Workflow Tutorial: Extending CQ Workflows with Workflow Porcess
There are a few useful Workflow Steps available that enables you create nice Workflow Models. That said many features are not provided or are implemented badly. This is a list of features that are missing out of the box:
- Logging of the Payload, Meta Data etc
- Replication using a Particular Replication Agent
- Sending Email Notifications using a Particular Template
- Conditional Jumps
-
etc
When building a CQ Workflow Models you are adding / configuring Steps which you select on the Sidekick:


CQ Workflow Tutorial
Last weekend I started to write down some articles about CQ’s Workflows. Initially I thought this will be composed of a few articles and that’s it. But then I remembered what I learned about Workflows since last year and even today I am still learning how CQ Workflow works and how to tweak them to make them do what I want / need them to do.
As of now I am thinking that I need to move these articles into a series of pages so that it will remain intact and in order of the Tutorial. This way it will be easier for readers to follow.
So what do I plan to add to the tutorial? This is a short list of what I plan to do in the future but I am pretty sure there will be more:
- Workflow Process and how to add custom functionality
- Workflow Step Dialogs to make Workflow Processes easier to use
- Dialog Participant Step Revision 3: how to use the selected data
- Making Workflows more Transparent with Logging
- (Conditional) Jumps inside a Workflow
- Workflow Vows and how to Handle Them
- Workflow Process / OSGi Service Configuration with Rumodes
-
Where did my Comments Go?
There is way more but I am not sure how many readers will actually use them so we will see.
Cheers – Andy
CQ Workflow Tutorial: Selection Dialog Revision 2
In this article we revisit the previously discussed Dialog Selection problem. In my opinion the Dialog is easier to deal with from a code editor than from within CQ Dialog Editor or CRXDE Light. When I am working on Workflows the only piece I edit in CQ are the Models. Everything else I code by hand based on examples. For that purpose I have the libs folder extracted from the **cq-content-<version>.zip (CQ Package).
Creating a Dialog ∞
Based on the previous project CQ Workflow Tutorial Basic Project Setup we are going to add the Dialog, create a new version of the Selection Data Provider and adjust our Basic Workflow. Finally we are going to install it in CQ.
In case you did not through the previous article or in case it is messed up go back to that article and download the solution.
First we need to decide where to place the dialog component. I am not sure if that is the best place but I always but my dialogs in the /apps/<project>/components/workflow/dialog folder within the View module.
-
Create this folder in the View module: /src/main/content/jcr_root/apps/cq-workflow-tutorial-basic/components/workflow/dialog.
